Advertising: Internet vs. Conventional Advertising Campaigns

Keywords: conventional advertising, internet advertising, internet advertisers, advertising campaigns, advertising solution, low-cost advertising

Internet advertising has increasingly become the preferred medium over conventional advertising since the early 1990s.

Internet Advertisers: Low-Cost Option Over Conventional Advertising

Consumers and business owners alike have become more accustomed to online advertising campaigns for public shopping and business dealings. Unlike conventional advertising counterparts — radio, TV, and print — Internet advertising solutions offer widely used, low-cost solutions.

Mixed-Media in Internet Advertising

Internet advertising differs, offering something conventional advertising solutions cannot — the capability for multimedia subject matter as a low-cost advertising solution. Internet advertisers can include text, images, video, and audio. They are able to design campaigns using logos, moving banners, animated, and 3-D imagery. Internet advertising campaigns can mix and match these forms to produce successful, low-cost Internet advertising solutions.

An affordable Internet advertising solution not only serves a communication function but also can assist as an effortless transaction and distribution pipeline. With a simple click and a money-saving Internet advertising solution, shoppers can discover all the information they need and explore complete lines of products and services in one location. Companies are happy to do business with clients, who, in turn, are happy to conduct business from the comfort and convenience of their own home.

Internet Advertisers Offer Convenience

Time, effort, and money can be wasted meeting in person. Conversely, low-cost Internet advertising campaigns benefit a company that receives sales for its products and services. In turn, consumers also receive guaranteed satisfaction and convenience.

Inexpensive Internet advertising solutions offer an advantage over conventional advertising solutions primarily because they are designed to be interactive. When a consumer reads and clicks on a web advertisement, it is easier, cheaper, and more convenient to respond or inquire via email than business reply cards. Unlike other advertising campaigns, this low-cost advertising has the unique ability to provide feedback in real-time — enabling companies immediate responses to inquiries or complaints.

Targeting Customers With Internet Advertising Campaigns

If you are new to online marketing, it is best to compare advertising, inexpensive vs. costly Internet ad methods, and start with an affordable option such as writing articles. Affordable website marketing makes it easy to provide a low-cost and effective means of attracting targeted, high-quality customers. Website publishers also gain cost-conscious prospects to generate advertising revenue from their unsold marketing inventory.

Conventional advertising has its place. However, as technology continues to rapidly develop and gain acceptance with consumers, customers increasingly prefer their services online. Low-cost advertising solutions online provide the proverbial win-win situation — for consumers, companies, and advertisers alike.

* Originally published on Suite 101 October 22, 2010

ClarkConnect Enterprise Edition: Multifunction Office Server Solution

In today’s business environment, home and small offices are becoming more and more common. These are mostly set up by private individuals who want to engage in entrepreneurship and take advantage of the many opportunities in the market. In today’s ever changing world, every type of business, whether an enterprise giant or small home based business, must harness the power of Information Technology to be competitive and achieve their business’ full potential. IT technologies can make communication, processes, transactions, and many other aspects much easier and faster for your business. However, some IT technologies can be cost prohibitive for small businesses. Examples of this are hardware network or UTM (Unified Threat Management) solutions from vendors such as Cisco, Juniper, etc. which are essential to your business connectivity and security. If it’s not cost prohibitive, it can be difficult to implement for your average user. For example, free Linux distributions include a firewall and other security software as well as network server functionalities (file servers, web servers, etc.) but the CLI (Command Line Interface) nature of these solutions can drive an average user away. For small businesses, they need IT solutions that can fill their needs while remaining inexpensive, or even free, without the need for too much technical know how to do the job — ClarkConnect can do all of this and more.

ClarckConnect is a powerful yet very affordable, or even free, Internet gateway and network server solution for home or small office networks. With its simple web management interface, you will be at ease when deploying and configuring this solution for your network. Since it’s packaged in a bootable ISO/CD, all you have to do is boot it, follow the simple setup process, and continue the configuration through its web GUI — you don’t have to learn many Linux CLI commands to make this thing work.

The latest version available today is ClarkConnect version 4.3. It’s available in two packages: the Community edition and the Enterprise edition. The difference between the two is that the Community version is entirely free with some of its functionalities stripped while the Enterprise edition has a minimal yearly fee. The functionalities that are stripped, or limited, in the community edition are: 1 to 1 NAT ability, DMZ, Dual/Multi WAN functionality, and it is limited to 10 Mailboxes. If you don’t need these stripped or limited functionalities then the free Community edition is right for you. However, functionalities such as 1 to 1 NAT ability and DMZ can be useful if you have more than one public IP address or for added security so you might consider the Enterprise Edition. For only $85 a year for its license fee, including free Level 1 technical support, the Enterprise edition also has a five year span of software update maintenance available — the Community edition only offers two years. If you consider the functionalities, that’s very reasonable when compared to other network or gateway solutions out there. As for its features, below is the list that you would expect to find in a package like ClarkConnect:

Firewall, Networking and Security – this includes intrusion detection and prevention, DMZ, 1-to-1 NAT, port forwarding and peer-to-peer detection, Multi WAN (for Enterprise) and Bandwidth monitoring and management.

VPN / Virtual Private Networks – includes PPTP, IPSEC site to site VPN, and now included in version 4.3 is the more secured OpenVPN.

Web Proxy and Filtering – this includes web proxy, content filter for control of web usage, and a Banner and Pop-up blocker.

E-mail – this includes integrated POP and IMAP server (dovecot), SMTP server (postfix), Webmail (horde), integration with Outlook and Thunderbird, AntiSpam (spamassasin, greylist and dspam), and Antivirus (clamav).

Groupware – this includes groupware packages (kolab) for collaboration and Flexshare for easy file sharing within your organization.

Database and Web Server – this includes the LAMP service (Linux Apache MySQL PHP) for your database and web server needs.

File and Print Services – this includes Samba for Windows files sharing, FTP server (proftpd), print server (cups) and network LAN backup using Bacula.

To use ClarkConnect, you must meet these hardware requirements:
Processor – can support up to four processors – Pentium, Celeron or AMD. 1 GHz is recommended for 5 – 10 users, 2 GHz for 20 – 50 users, and 3 GHz for 50 – 100 users.

Memory – at least 512 MB in memory. 1 GB for 5 – 10 users, 1.5 GB for 20 – 50 users, and 2 GB for 50 – 100 users.

Disk Space – at least 1 GB of disk space. For Critical environments, RAID configuration is recommended.

Deploying ClarkConnect Enterprise

Once you meet the hardware requirements for ClarkConnect, then you’re all set to deploy this great solution. In this case, I will use the enterprise edition with a trial license so all functionalities will be present. You can download the latest version of ClarkConnect at http://www.clarkconnect.com/downloads and choose between community or enterprise editions — both in bootable ISO format which you need to burn on a CD. To get the 30 day trial license, go to this link, https://secure.clarkconnect.com/webapp/evaluation.jsp, create an account and request a 30 day trial license. The license code will be emailed to you. Simply enter the trial license code into your account profile to activate the trial license. Once you have downloaded and activated the trial license, you can now proceed with the installation.

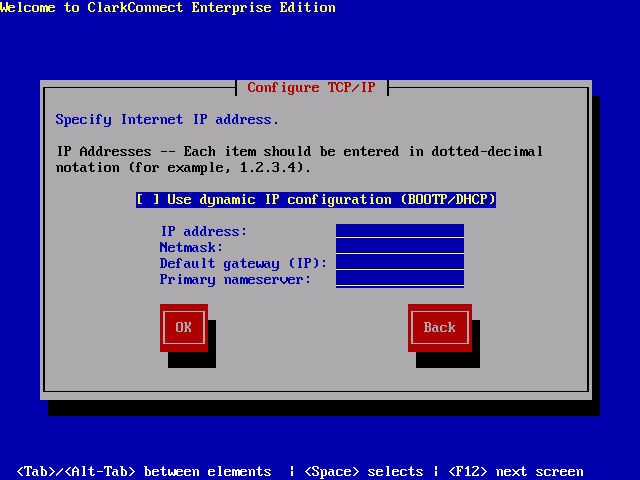
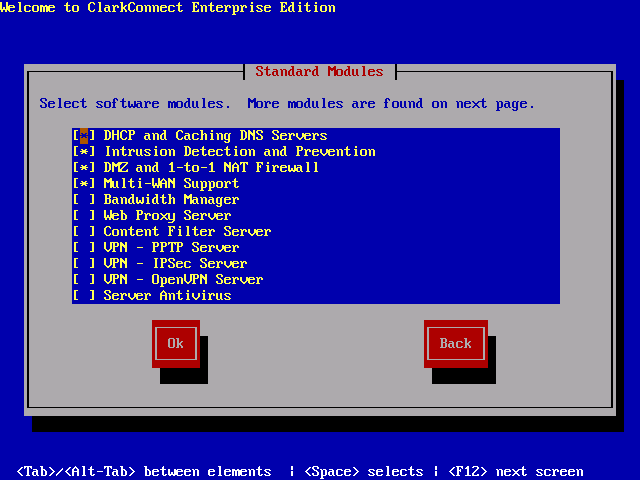
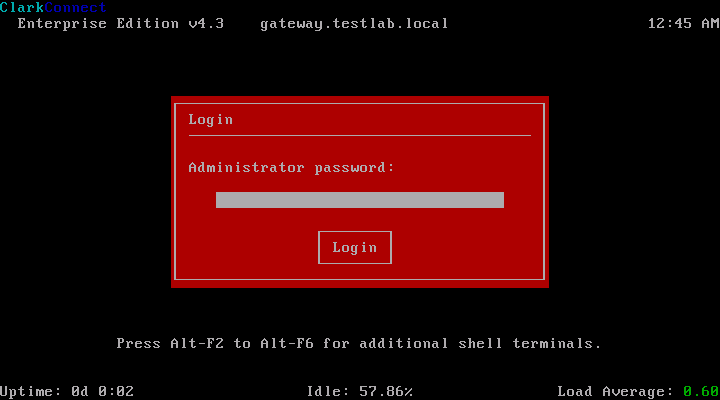
Boot the ClarkConnect ISO or CD and you will be welcomed to a familiar Linux boot prompt. Type “linux” to continue the boot process. The next installation steps are very straight forward. You will be asked first for some settings such as keyboard layout and time zone. After that, you must choose the installation type: “install” if it’s a fresh installation and “upgrade” if you have an existing older version of ClarkConnect. Then you have to choose if the server configuration will be a gateway or a standalone server. Choose gateway if your ClarkConnect server will be your firewall and network server. You must have at least two NICs (Network Interface Cards) for this configuration to work — One for the external interface going to the Internet and the other network card for the internal LAN (Local Area Network). Choose standalone if you already have an existing firewall and you only need the server functionalities of ClarkConnect. After that, you will configure some network settings such as the type of external interface connection (Ethernet, PPPoE, DSL, etc.), public and private address, hostname/domain name of the server. You must also set the system password and configure the partition for the server. You can let ClackConnect handle the disk partitioning or create your own. Once that is configured, you must select the functionalities that will be installed on the ClarkConnect server. To minimize resource usage on the server, choose only what you need. After you select the functionalities you need, simply wait for the installation process to finish and reboot the system.

Figure 1: Install or Upgrade?

Figure 2: Server Operation Mode

Figure 3: Network Settings

Figure 4: Packages

Figure 5: ClarkConnect Console

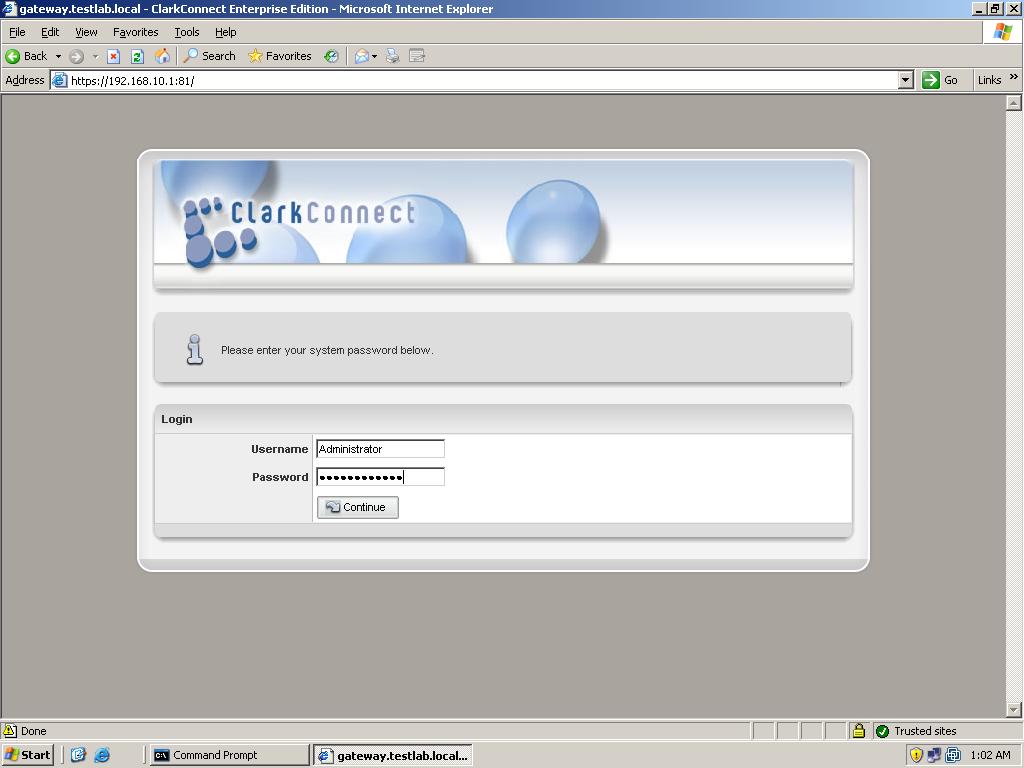
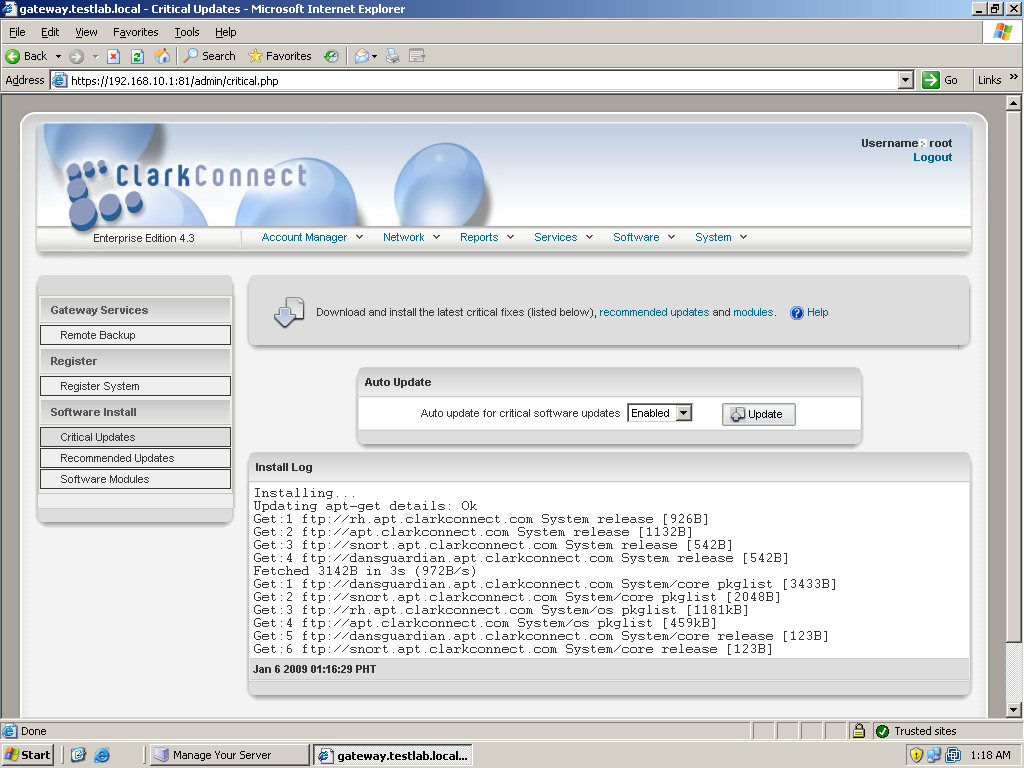
On the system’s first boot, you must register and update the server. To do that, just log in to ClarkConnect’s web management interface by entering this address into your browser: (https://IP address or hosname:81). The default username that you will use is “root” and the password is the system password you set during the installation. You will then enter the management interface. In the top menu of the management interface, click on Services, to show its submenu, then click on “Register System” to start the registration wizard. In the software registration box click on the option to add a new system to your account. You will be then asked for your account username and password that you created when you requested your trial license earlier. Just follow the steps which are very straightforward. Once you finish the registration process, it would be a good idea to update the system. To update the system, click on Services again and choose Critical or Recommended updates. Of course it would be a good idea to do the critical updates first. It will display the modules installed and their respective current versions. Just select the modules you wish to update and click Go to proceed. Wait for the update to finish. The process is the same on Recommended Updates. Once the system is updated, you can now proceed with the configuration of ClarkConnect’s functionalities.

Figure 6: Login Page

Figure 7: Management Interface

Figure 8: Registration

Figure 9: Update Process

Network and Services Configuration

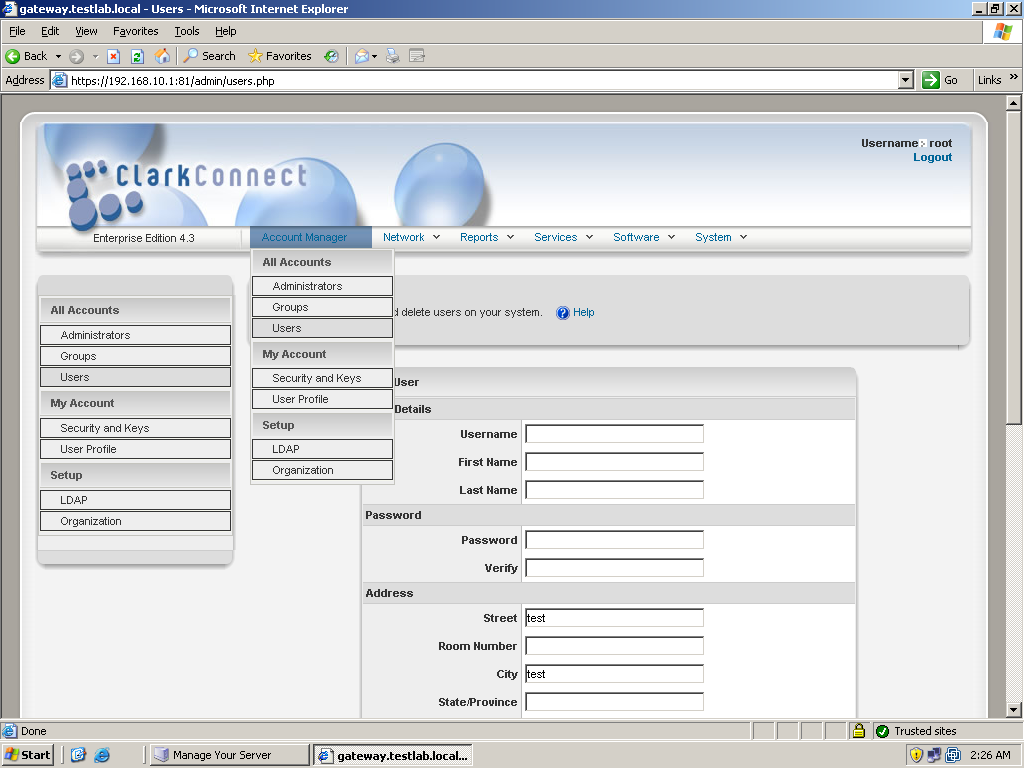
ClarkConnect has many features and it would be impossible to thoroughly discuss each one in this article. So we’ll focus more on the basic functionalities that are necessary in a home or small office. The first things to configure are the Network settings which include firewalls, NAT, port forwarding, etc. But, before that, it is a good idea to create first users or groups which will be later used when you create network policies and rules. To do that, go to Account Manager in the top menu and click on Users. This will display user information and status. You will want to click on the option to create a new user. Just fill in the necessary details such as username and password, full name, address, etc. You must also select the services that will be enabled for that user. This includes a Mailbox service, OpenVPN, PPTP, Proxy Server, File Server, FTP, and Web. Then, click Add to create the user.

Figure 10 : Add User

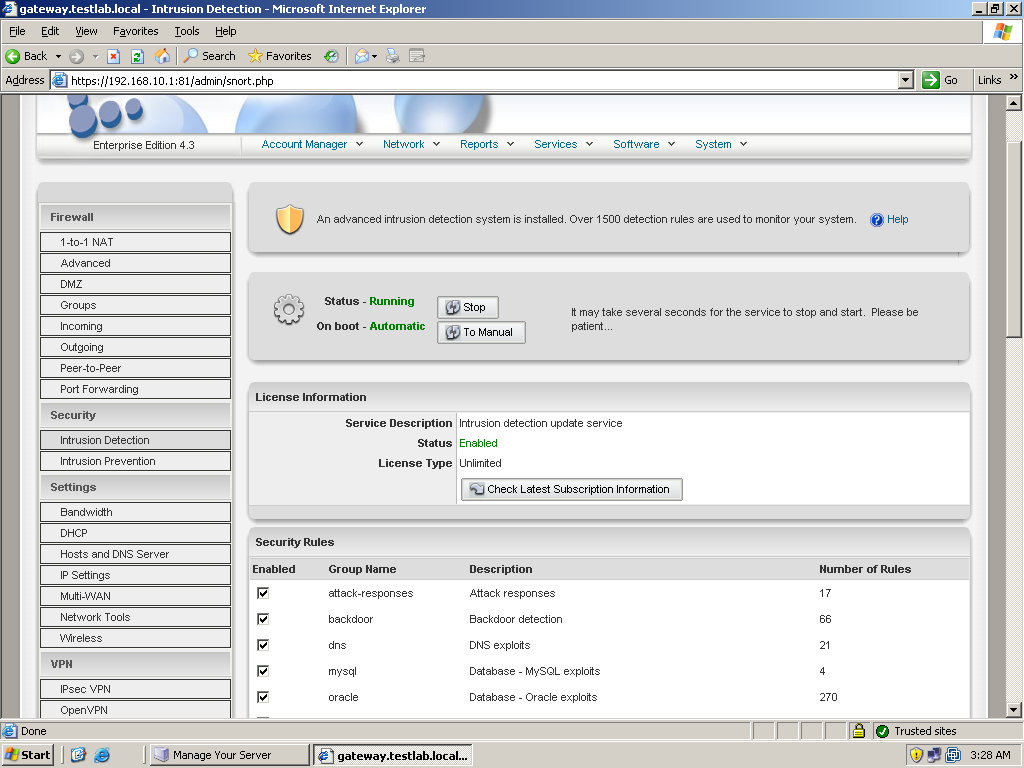
Next, let’s configure the network and security settings. In case you need to change the IP or Hostname settings you set up during installation, just go to IP settings or Hostname and DNS settings under the Network menu. There are many options under the network menu. Let’s configure first the firewall. There are several ways to create firewall rules in ClarkConnect. Under the Network menu, you can choose either Advanced, Incoming, or Outgoing. Advanced will let you configure customized rules. Select this first if the action would be to block incoming, accept incoming, block outgoing or port forwarding. After you select an action, just enter the IP address to block or deny, followed by the ports and protocol then click Add when you’re finished. You can also create a rule using Incoming. It is almost the same as Advanced with the difference being the rules based on Incoming allow traffic entering your network. There’s also a selection of predefined services that you can choose such as HTTP, FTP, etc. As for Outgoing, it’s the same as Incoming but it will block traffic going outside. Just like Incoming, you can select the services to block. Other options in networking include Port Forwarding that basically forwards traffic to a specific port of an internal server. You can use this if you only have one available public IP. Just create the firewall rules that will suit your needs and remember that firewall rules follow a top to bottom approach – meaning that once a rule at the top is satisfied, it will not test the other rules below it. Other network security features include intrusion detection and prevention. There is not much to configure here except to select the possible security threats that you want to detect and to make sure that the intrusion prevention database, based on Snort, is updated.

Figure 11: Firewall Configuration

Figure 12: Intrusion Detection

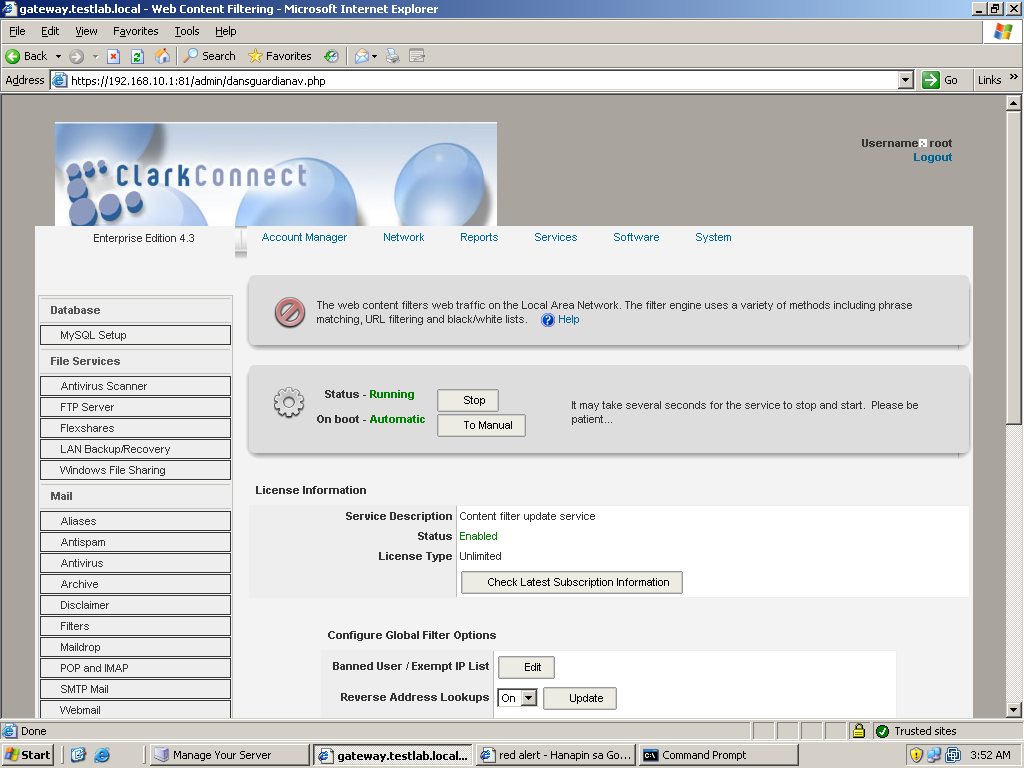
Now let’s proceed to some services such as Web proxy’s content filtering and File server functionalities. ClarkConnect’s web proxy capability is based on the popular Squid proxy. While you can enable the web proxy to operate in transparent mode, which does not require any additional settings on your browser to work, this does not support HTTPS traffic and user authentication but does support Content filtering. To configure your web proxy, just go to Software on the top menu and choose Web Proxy. You simply need to select the settings to enable such as transparent mode, content filtering, Ad and Banner blocking and User authentication. Remember that you can’t enable both transparent mode and user authentication. If you will enable content filtering, you must first enable its service. On the Software menu, click on Content Filter to enter its configuration interface. If the service is stopped, click on the Start button. Some settings that you can configure on content filtering are Virus Scanning, URL analysis, Site list, Phrase list, Blacklist, Extension/MIME, etc. Just select the necessary options you wish to enable.

Figure 13: Content Filtering

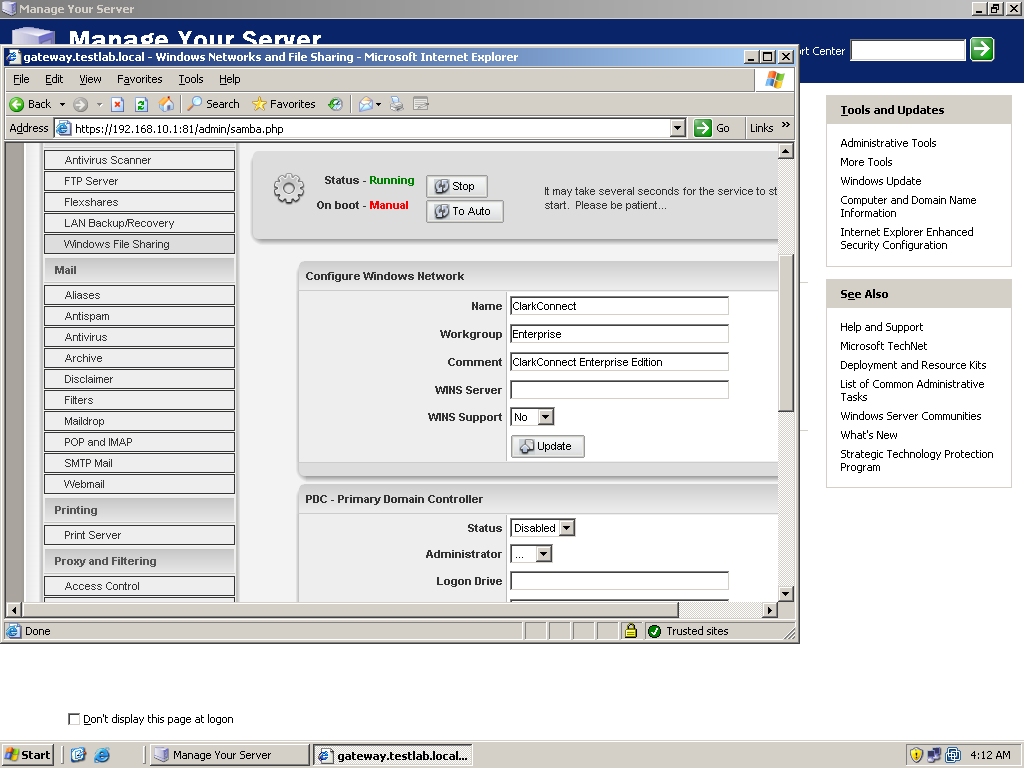
Next, is to configure a simple file server using ClarkConnect. The main file server system service of ClarkConnect is based on Samba so both Linux and Windows environments can take advantage of it. Go again to the Software menu and look for Windows File Sharing. Click on it to bring up its configuration page. By default, Windows File sharing is disabled so click on Start to enable it. Once running, configure its settings. The configuration is so basic that you will only need to provide a name, workgroup, and description of the network share. You must also enable what folders to share. By default, the home directories of each user are enabled. To create custom folders, you must use ClarkConnect’s Flexshare module. But for now, let’s stick with home directories. Once configuration is finished, just click on Update. With that, you now have a working Windows Network file server based on Samba.

Figure 14: Windows File Server Configuration

Testing

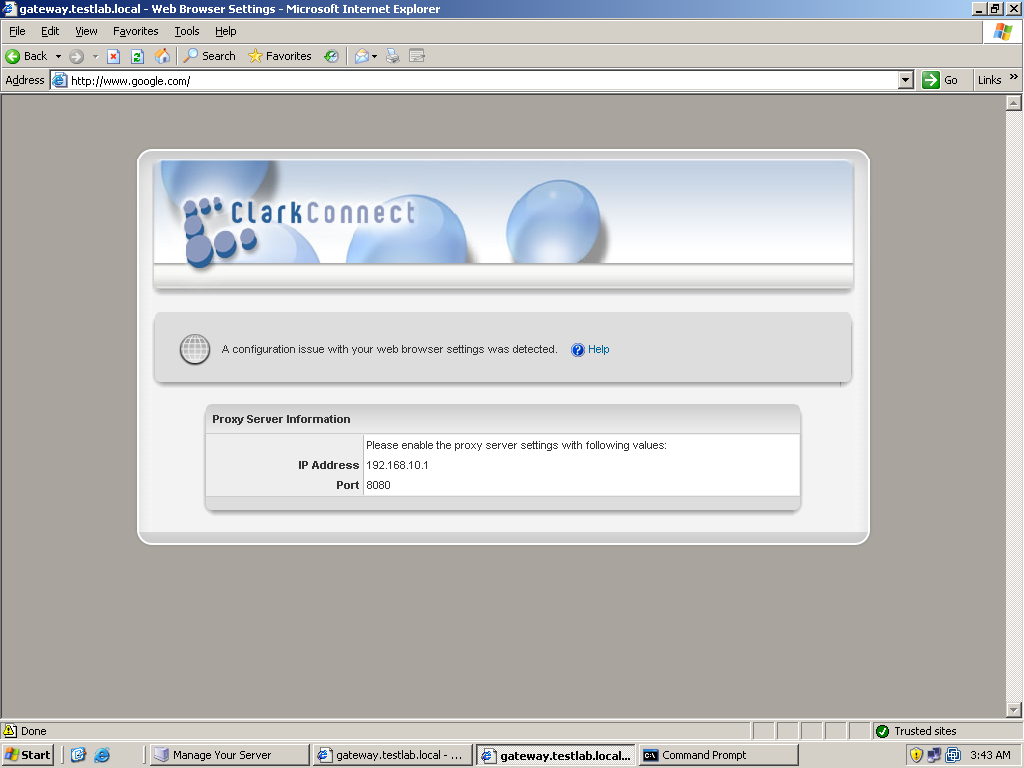
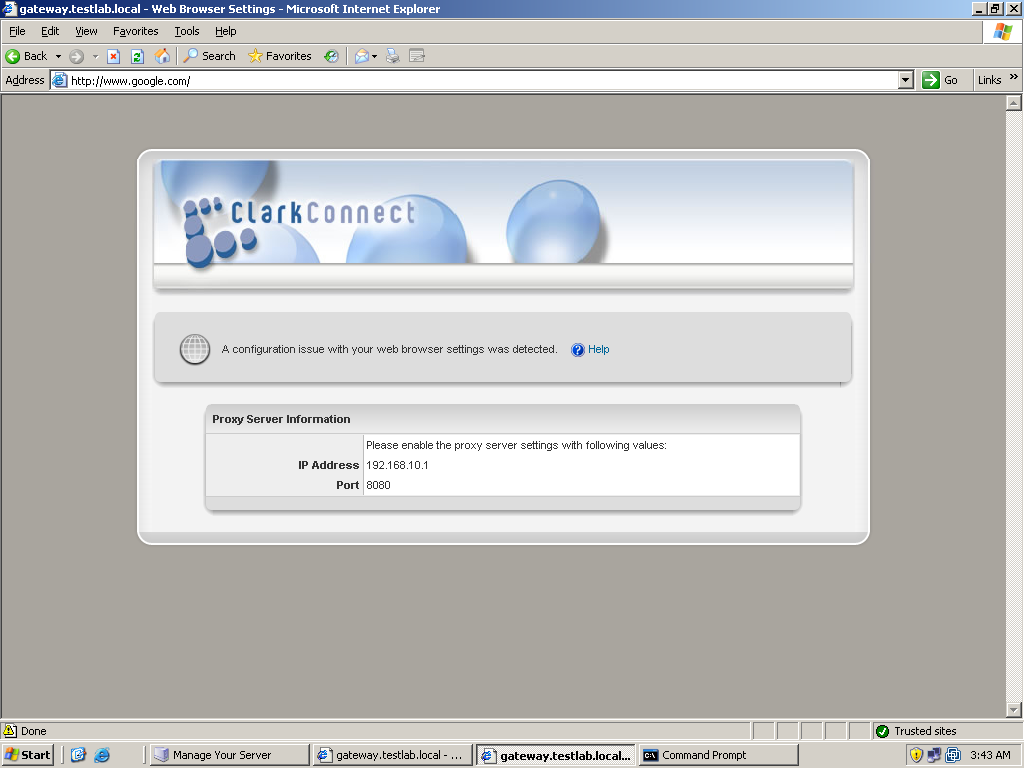
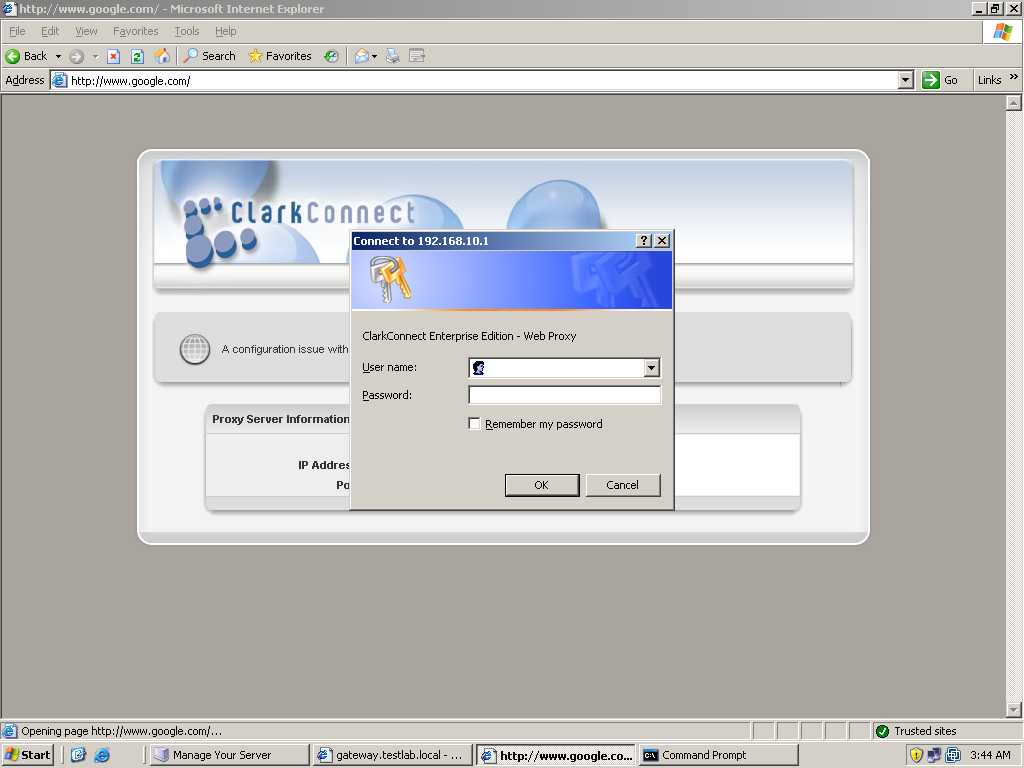
Let’s test the configuration we’ve done. Let’s start first with the web proxy. Since we want user authentication, transparent was not used. The downside is that you need to configure the browser’s proxy settings. Try first by browsing without configuring the proxy settings of the server. You will be directed to a ClarkConnect page telling you to enter the settings indicated on the page into your browser’s proxy settings. If you enable content filtering, the port to be used by the proxy is 8080. If there’s no content filtering, the port would 3128. Once you enter the proxy settings, try browsing again. If it’s the first time you open the browser to browser, a login dialog box should appear for proxy credentials. Use the user account you’ve created for ClarkConnect. After entering the proxy credentials, you can now successfully browse. Now try testing the content filtering capability of ClarkConnect. You will observe that when you access sites that are forbidden, like pornographic sites, the Web page won’t load. This means that the content filtering is working.

Figure 15: Need to Change Proxy Settings

Figure 16: Web Proxy User Authentication

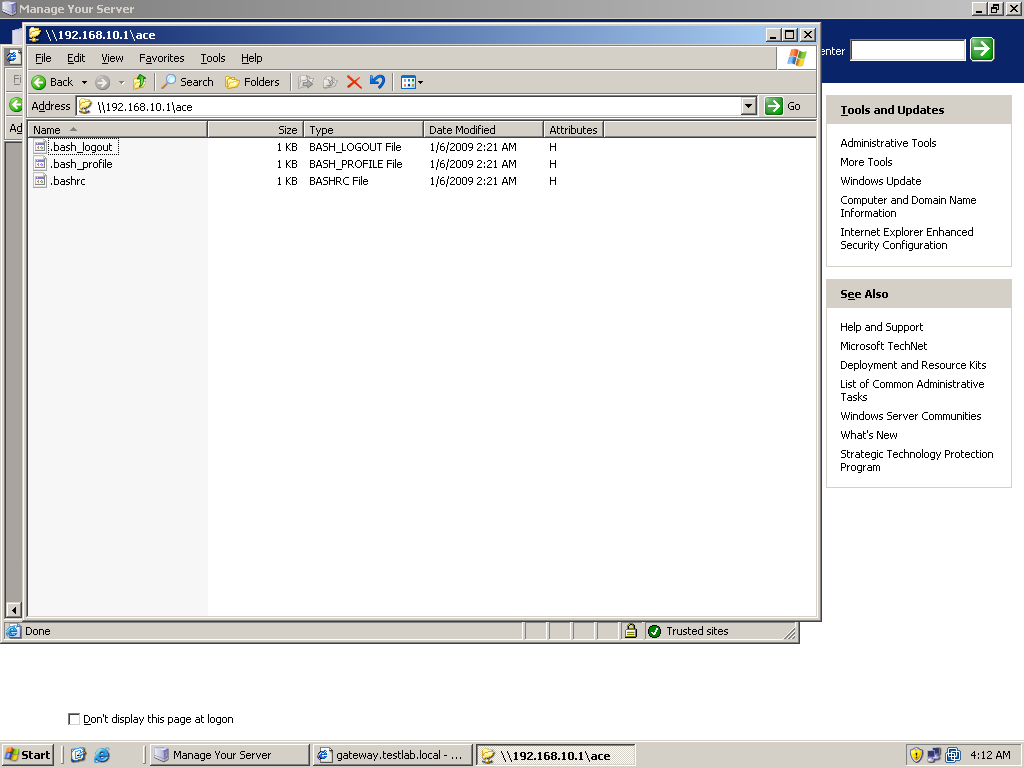
Now, let’s test the ClarkConnect Windows File Server we configured. Open the Run dialog box in Windows and enter the address: \\IP address or hostname of the server\. It will ask again for logon credentials — just enter the username and password you have created in ClarkConnect. Depending on the user account you enter, the home directory for that user should be accessible.

Figure 17: File Server Login

Figure 18 : File Server Folder

Conclusion

Although there was time enough to discuss only a few features in this article, there are still many features that ClarkConnect has to offer. If possible the next series of articles about ClarkConnect will discuss other features such as VPN, Backup, Groupware solution, and Mail Service. As shown in this article, configuration of ClarkConnect is very simple and nearly, if not completely, free. For home and small office systems, ClarkConnect can be the answer to your IT networking needs.

* This piece was created as speculative work (on spec) or the rights to this piece have reverted back to the original author and is for sale. Learn more.

Adito (Formerly Known as Ssl-explorer) – a Free and Easy to Use Ssl-vpn Solution

VPN is becoming more common nowadays, not only in enterprise environments but also in personal home networks as well. Many use VPN to access both company office resources as well as their home networks. VPN can provide the security users need to remotely access their network but there are two types of VPN used today: the more common and older IPSEC VPN and the much newer SSL VPN. IPSEC VPN is well established in enterprise environments today and can also be used in home networks. Most of the midrange, or even entry level, routers from popular network device manufacturers include IPSEC VPN functionality. You can also see software based forms available for free — especially since it runs in a UNIX/Linux environment. Although well established and proven already, IPSEC VPN implementation can be quite a task for the normal user. There are many parameters to configure, ranging from authentication and encryption algorithms up to features such as NAT-T, and you must match all of those settings to each end of the VPN tunnel. You also need to use IPSEC VPN client software that can vary by manufacturer. SSL VPN is gaining popularity due to the fact that it provides better security than IPSEC, since it uses SSL, and is also easier to setup and use. You don’t have to configure those authentication or encryption algorithms — much less match them on each end of the VPN tunnel. You also don’t need specific VPN client software, clientless, to connect. This means that you only need a Web browser and Java support to connect to your office or home resources.

Most network device manufacturers today include devices that support SSL VPN in their product lines. Popular examples include the Secure Access device from Juniper and the VPN Concentrator from Cisco. However, these commercial SSL VPN devices usually cost several, if not tens of, thousands of dollars. For small business or home usage, these devices are cost prohibitive. If this situation sounds familiar, then Adito is your answer.

Adito is a free and open-source solution for SSL VPN that originated in the now closed propriety software SSL-Explorer. Before Adito, a company called 3SP provided the SSL-Explorer Community edition for free — offering access to the basic functionalities of SSL VPN. They also had a commercial edition with more features but the free Community edition was enough for most SSL VPN needs. However, just last year, 3SP was acquired by a company called Barracuda Network who stopped providing SSL-Explorer as a software and made it hardware based — which cost at least a thousand dollars. With this development, a group of people who love the great functionality that SSL-Explorer offered decided to continue the development of the now abandoned SSL-Explorer to develop Adito. All of the features you would expect from SSL-Explorer such as Windows AD (Active Directory) integration, UNIX directory integration, User/group based access, remote network file sharing, web forwarding, web based RDP, SSL tunneling, etc. are also included.

Adito compared to Common VPN

I would expect that you have already encountered VPN or are at least familiar with it in one way or another. You may have encountered it at work — especially when you’re mobile or at home and need to access office resources. Or you might be using it to connect to you home PC to do some remote tasks. Most VPNs either use IPSEC technology or, sometimes, the less secure PPTP. These VPN technologies require some sort of VPN client software on the client side to work (especially the IPSEC VPN). Adito however, is a clientless VPN. Since Adito is Java Based, which resides on most PCs today, this means that you don’t have to install anything on the client PC. It is based on SSL VPN, which is much more secure that IPSEC, and is also much easier to setup as compared to IPSEC — which requires many parameters such as encryption algorithms.

Adito works by creating resources inside the private network and creating an SSL VPN tunnel when the client requires access to that resource. Therefore you can easily manage and control what resources remote users access — unlike other VPNs in which they can access the whole network when connected. While you can also control the internal network resources that a user can access in most VPNs, this usually requires lengthy policy creation or access list definition which can be both troublesome and time consuming if you have many users. In Adito, user access and management is simplified. You may notice that the most common resource that can be used in Adito is RDP through SSL VPN. You might say that there is numerous free software that can also do that. However most of these RDP programs do not have adequate security if used alone. You’ll most probably need to also use a VPN tunnel for it to be secure. And most of these RDP software require an RDP client of some sort. Adito doesn’t need any client software installation since everything is Java based. Finally, aside from the RDP capability, you can access securely internal web based applications, remotely access network shares, and create SSL VPN tunnels for applications that can be accessed through TCP/IP such as SMTP or IMAP for corporate email).

For example, for a common office setup, users usually access a file share, an internal company web site or web based application, and an email server. For them to access it when they’re not in the office, Adito can provide those resources in a secure manner using its features such as Network Places, Web Forwarding, and creating an SSL Tunnel for SMTP Mail Server. In case they need to access a terminal server, that can be easily done through Adito’s Java based RDP application. Please note that all of these resources pass through an SSL VPN tunnel that’s being created as users access the resources.

Using Adito

Adito is platform independent and is available as a source package for Linux distributions as well as Windows. For this article, I used Ubuntu 8.04 (Hardy) LTS server edition. The basic requirements to install and run Adito are Java runtime environment version 1.5 or above from Sun Microsystems. I also used Java SE Development Kit (JDK) version 6 update 11 [Links ref. #1]. If you’re in a CentOS or Redhat environment, you can get an RPM package from there as well to run. You can also use your distribution’s package manager and, in my case, I use apt-get to download and install the latest JDK build. To do that, run this command:

# apt-get install sun-java6-jdk

In case your distribution already has an older Java package installed, you must configure your distribution so it will use the correct version. First issue this command:

#ls –l /usr/lib/jvm

total 4

lrwxrwxrwx 1 root root 19 2008-12-29 18:35
java-6-sun -> java-6-sun-1.6.0.07

drwxr-xr-x 8 root root 4096 2008-12-29
18:35 java-6-sun-1.6.0.07

The previous command will list the available Java version installed on the system. As you can see, my system only has Java 6 installed since the base installation of the Ubuntu system is very minimal and doesn’t include any Java packages. If you have more than one version, you will have to issue the following command in a Debian or Ubuntu environment.

# export JAVA_HOME=/usr/lib/jvm/java-6-sun

Also note that you do not put the specific Java build in the previous command, indicate “java-6-sun” and not “java-6-sun-1.6.0.07”, since it will cause problems when you upgrade the Java build if you use the specific build name. You must also verify and correct, if necessary, the version used by other Java components such as Javac, Javah, Java-vm, etc. For Debian and Ubuntu systems, the different versions are managed using the alternatives system and you can easily check that using the program “galternatives”. Just use apt-get to download and install “galternatives”.

# apt-get install galternatives

Adito also requires you to install Apache ANT version 1.7 or higher [Links ref. #2]. You can either directly download it or use your package manager of preference.

# apt-get install ant

Now you can proceed with the Adito installation. First, download a copy of Adito [Links ref. #3], and choose whether you want the source or binary package. The latest version is 0.9.1 and I downloaded the binary tar.gz package. Since I use Ubuntu Server without any desktop interface, I’ve used “wget” to download Adito:

# wget “Adito direct URL link”

You can then extract the content of the tar.gz package. For my system, I put Adito at /opt directory.

# tar –xzvf adito-0.9.1-bin.tar.gz –C /opt/

Go to the Adito directory /opt/adito-0.9.1 and start the installation process.

# cd /opt/adito-0.9.1

adito-0.9.1 # ant install

This will start the installation process of Adito. The setup process is highly dependent on the Java environment of the system. So if you didn’t configure properly the Java version (if you have multiple versions) from the previous steps, the setup won’t continue. If, for example, you don’t install the Java package which comes from the official Sun site, the setup will indicate errors, that you’re using the GNU/GCJ version of Java, and will advise you to install the Sun version. Also make sure that you’re in “su” mode or the setup process will also halt. If everything is good, the setup process will show a message telling you to access the web based installation wizard of Adito. Open your favorite browser and type the address indicated in the message. This is usually in the form of “http://IP address or hostname:28080/. The address will bring you to the setup wizard. In case you need to stop the setup wizard process, you can click “cancel” in the web based wizard or press “ctrl C” on the CLI.

The web based setup wizard is very straightforward. First, you have to create or choose an existing certificate.
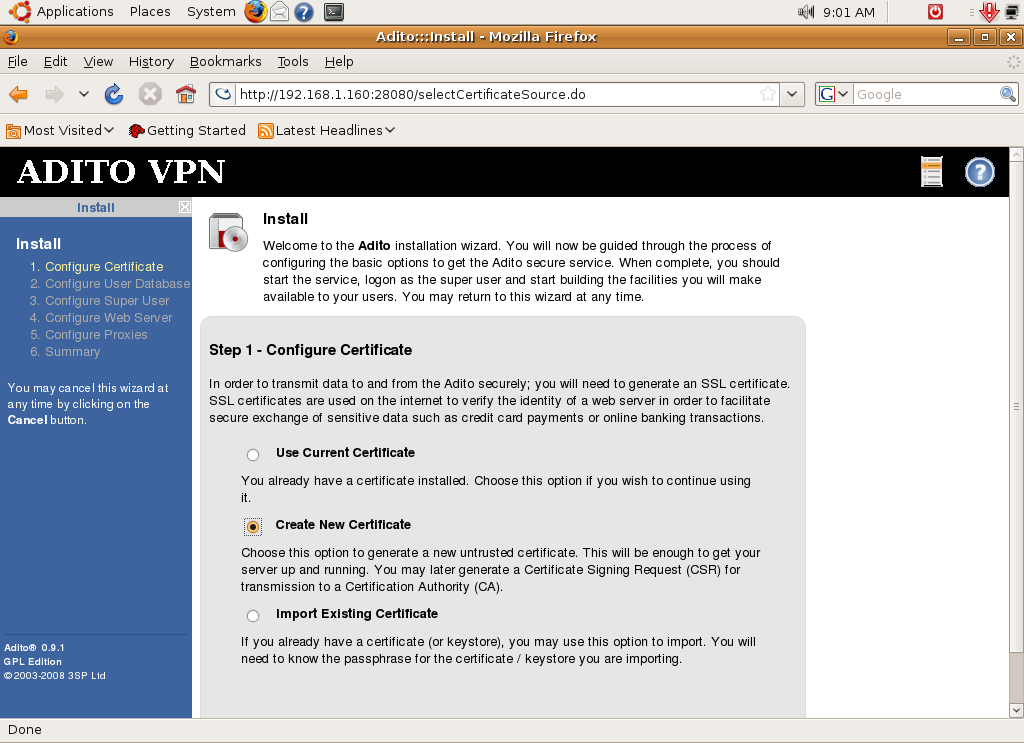
Figure 1: Setup - Certicate

If you don’t have a certificate, create a new one. The certificate that you will generate is not trusted but will be enough to run the Adito server. For security purposes, you must use a certificate signed by a certificate authority (CA). If you already have an existing certificate, you can import it and just supply the necessary password. In my case, I chose to create a new certificate.

The next step is to create a password, if it’s a new certificate, or supply the correct password if the certificate is imported.

In the following step, you will need to provide the certificate information such as hostname, organization, location, etc. — this step is not necessary if you choose to import a certificate and you will proceed directly to the user database configuration.

Figure 2: Setup - Certicate Information

Once you finish with the certificate setup, you must now configure the Adito user database. Adito can get user information from three sources or mechanisms: through Windows AD, through Adito’s built-in user database, and through UNIX directory.
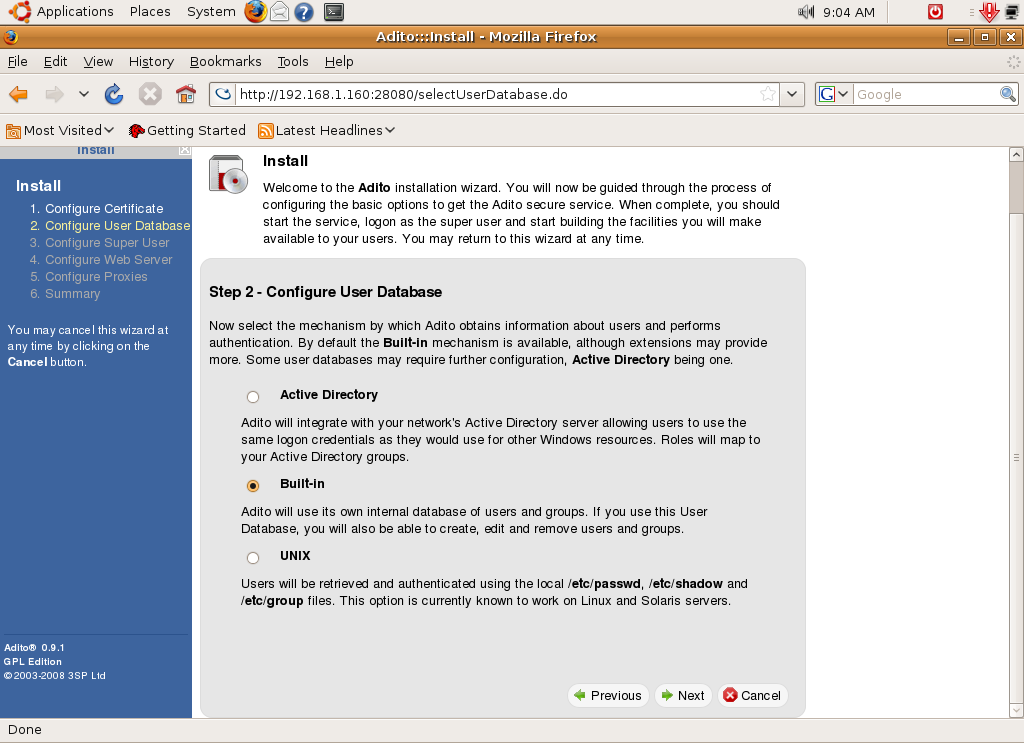
Figure 3: Setup - User Database

If you will use Adito for home or small business purposes, it would be best if you use Adito’s built-in database. In this mechanism you will create the users and groups inside Adito’s management interface. If you have a big organization and already have an existing directory of users through Windows AD or a UNIX directory, it’s best to use the AD or Unix functionality since you don’t have to create each user again in Adito. If, for example, you choose AD then the next steps will require you to supply AD information such as domain controller hostname, backup domain controllers, domain name, etc.
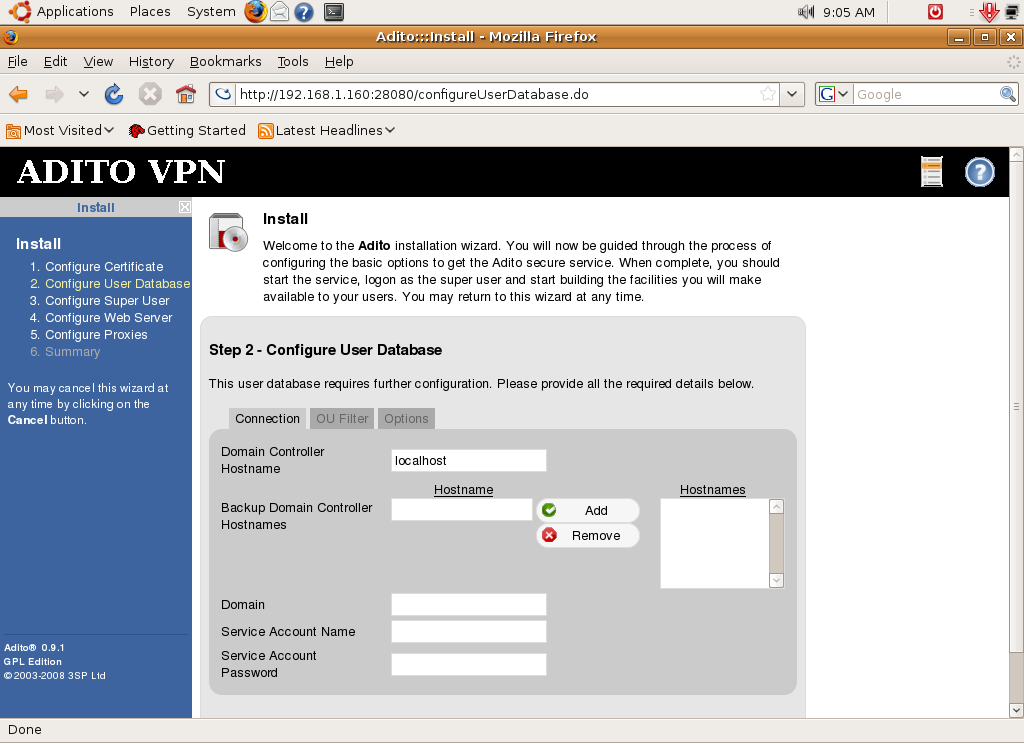
Figure 4: Setup - Active Directory

If you choose the built-in database, just like in my case, you will go directly to the “Super User” configuration.

The “Super User” basically refers to Adito’s administrator that can configure and manage Adito SSL VPN. You just supply the username, password, and email of the “Super User” in this part.

The next step will take you to the configuration of the Adito web server. You just have to configure the port (default is 443), protocol (definitely HTTPS), the listening interface of the server, and the accepted external hostname. If you only have one public address and already have a web server using port 443 for HTTPS, just supply another one. In my case, I used port 8443. Although it is quite obvious that HTTPS should be used in SSL VPN for security, you can also choose HTTP for the protocol if you have good reasons to do so. You must also choose the listening port of the server. All of Adito server’s interfaces are in listening mode by default. For security, you can specify a specific listening interface. You can also set the external hostname of Adito in which it will allow a connection. The default behavior is to allow a connection to Adito SSL VPN even if the external hostname is invalid.
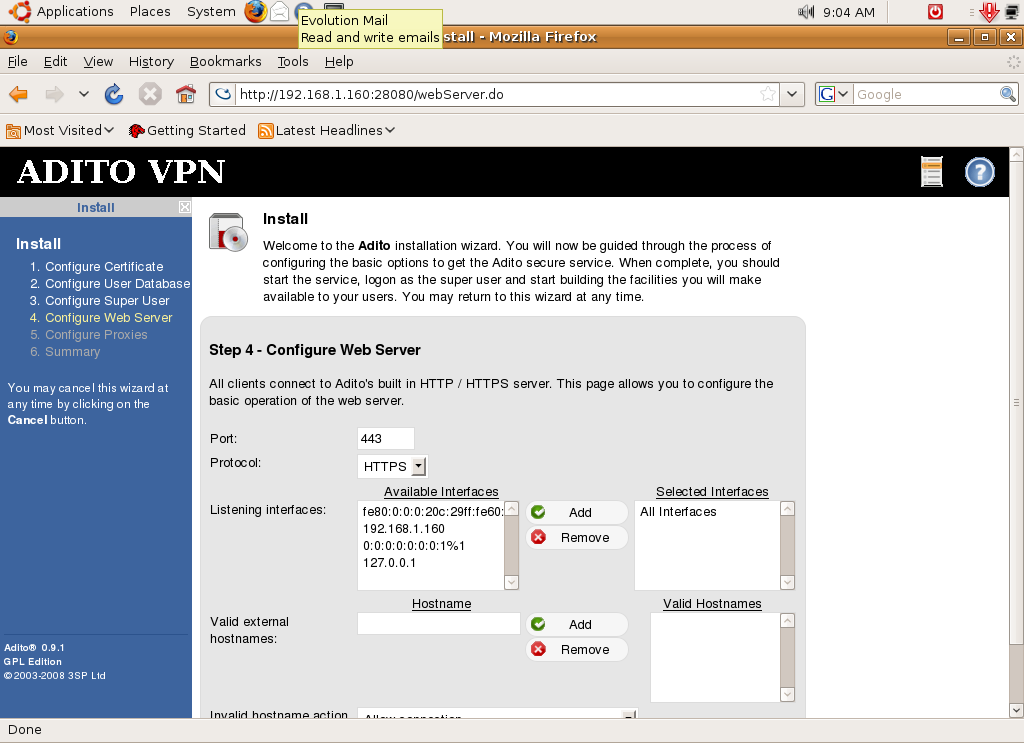
Figure 5: Setup - Web Server Parameters

The next step is proxy configuration. This is only applicable if you are behind a proxy to access the Internet. Adito might need access to external resources such as extension downloads thus the need for Internet access. In my case, I’m not behind a proxy so I just bypassed it. If you are behind a proxy, simply check the proxy box, and supply the proxy settings.

The next screen in the wizard will show you the summary of what you have configured. If all of your information is correct, just click “Finish” and the wizard will apply the changes.

After applying the changes, Adito setup wizard will shut down. Next, return to the CLI shell to start the Adito setup process. After the Adito installation, you still have to install its service. To do that, just use this command:

adito-0.9.1# ant install-service

You can now start Adito services using the command below.

Adito-0.9.1# ant start

To verify that everything is working normally, open your browser and enter the address of the Adito server. The address is in the form, “http://IP address or hostname:8443”. You will notice that the 8443 in the address is the port we specified during the setup wizard process. Just change it to reflect the port you have specified. If everything is set up properly, you will enter Adito’s login screen.

Once at the login screen enter the “Super User” account you have created and its associated password. You will then enter Adito’s management screen.

Figure 6: Adito Management

If you have made it this far, then you have successfully installed Adito. You can now start configuring your SSL VPN resources.

Creating and Managing Resources

One nice feature in any SSL VPN implementation is that you can specifically choose a resource for remote users to access. This can be done also on IPSEC VPN but will require much more configuration since you must configure firewalls (for the specific port), user/group policies, etc. With SSL VPN, once the user/group database is in place, you just create a policy (which can be easily done), create a resource (RDP, network file sharing, etc), bind it to the policy and you’re done. In Adito, the management interface is so simple that you can master it in no time. Within the scope of this article, I’ll show you how to configure Adito for Windows RDP/Terminal access as well as file sharing. By the way, if you have spare public IP addresses, you can assign a public static IP to the Adito server to access the SSL VPN remotely. Otherwise, you can also use port forwarding if you’re short on public addresses.

Now going on to the Adito management interface, you will observed that the menu is subdivided into four parts: Configuration, Access Control, Resources, and System. Under Configuration. You can configure the system settings, such as the one you configured on the setup wizard, and even configure security options such as messaging settings (for mail delivery), Windows integration (for DNS,domain settings, etc.) and others. However, since the default settings are adequate for a working SSL VPN, I will spare you many of the other details for now until there is sufficient interest.

One important component under Configuration that I will discuss is the Extension Manager. Since Adito comes from the SSL-Explorer community edition, it only contains basic extensions like SSL-Tunnel, Applications module, Network places, etc. You won’t have extensions for Drive mapping, SFTP work places, Virtual hosts, etc. But with active development of Adito, more SSL-Explorer enterprise features may be added very soon. For now, we will have to use an RDP extension for RDP connectivity.

Visiting the Adito application URL [Link ref. #3], there are several extensions for tightvnc, ultravnc, winscp, etc. Choose the properjavardp for native Windows RDP/terminal connectivity. When you download the file, it is in a tar package and you have to extract the zip file inside. Once extracted, just go to “Extension Manager” under configuration and on the right side, click on “Upload extension”. Browse for the zip file and upload it. Once uploaded successfully, it will be shown in the extension manager. Now that we have an RDP extension, let’s proceed to user/group creation.

Figure 7: Adito Extension Plugins

To create a user, go to Accounts under “Access Control”. It will show the users database. On the right side, click “Create new User account”. You will just need to enter user information including the username and password on the screen that follows.
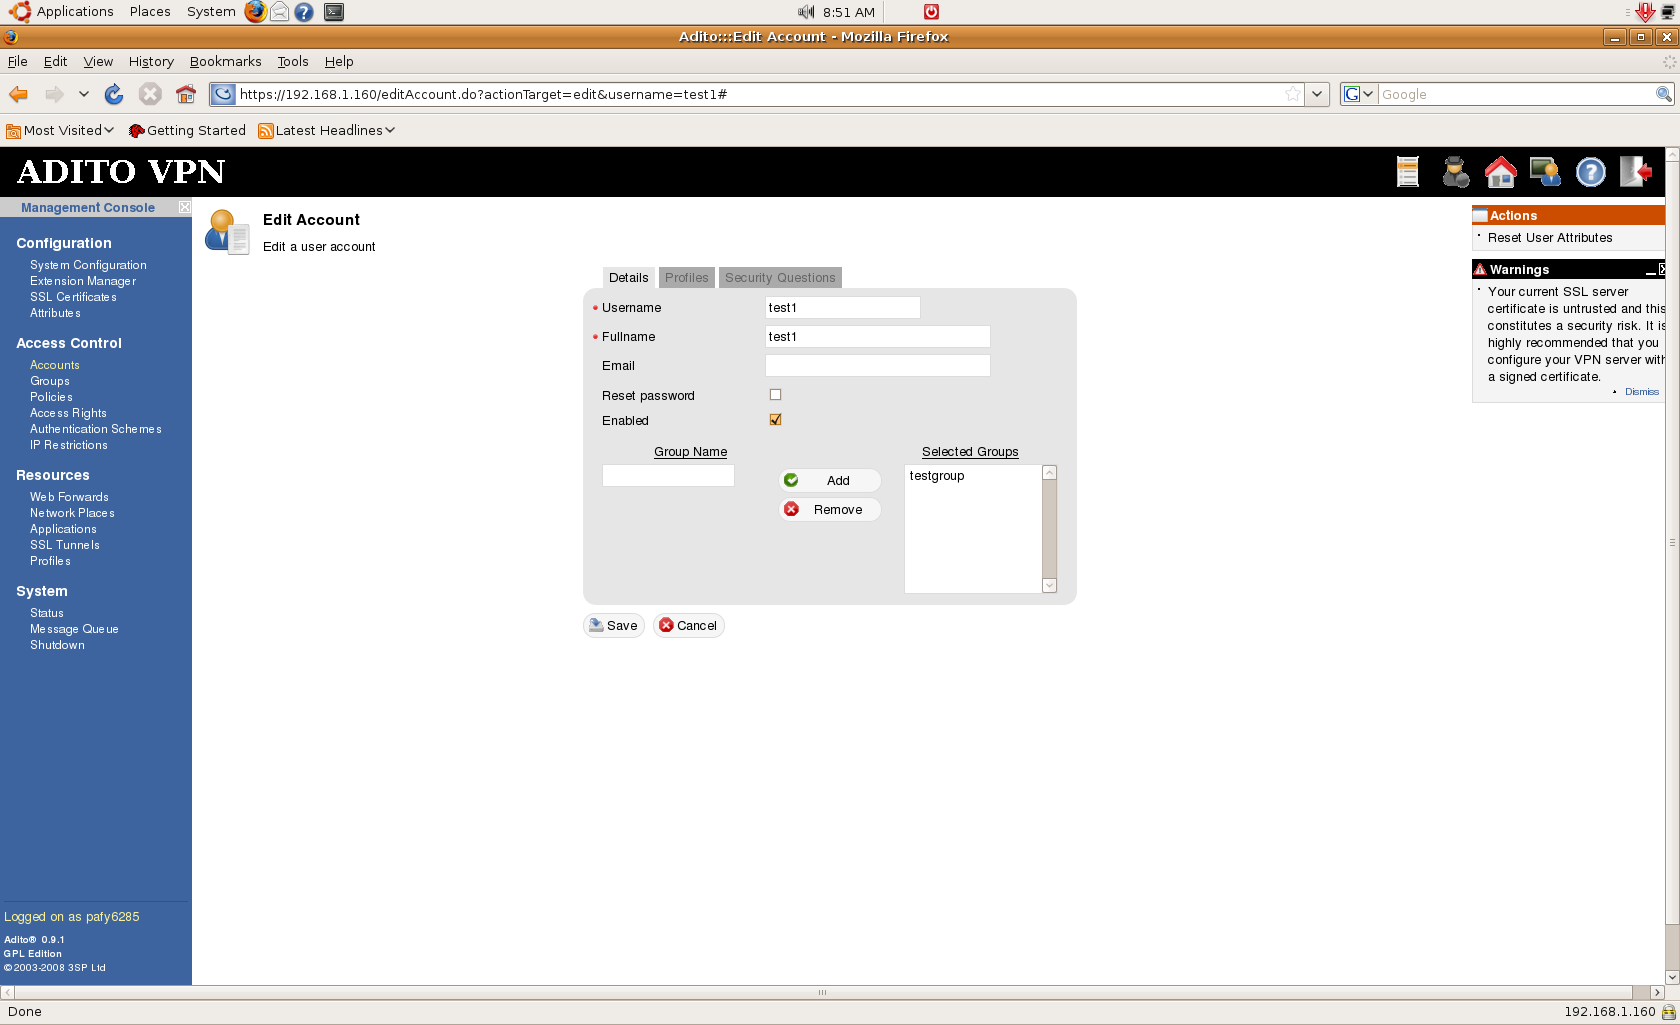
Figure 8:User Creation

You can also assign the user to a group during creation. Just click on Save to finish the process. If you’re using the built-in user database for Adito, just create more users as needed.

The next step is to create a group. Creating a user group can help you easily manage and assign the resources and policies for a set of users. The group creation process is very much the same as user account creation. You can also put users inside the group during creation.

After you set the users and their corresponding groups, you must create a policy. The policy can be assigned to a user or a group and it defines to what resources the user or group has access. Creation is very simple. Simply fill in the policy name and description, assign it to a group or user, and you’re finished.
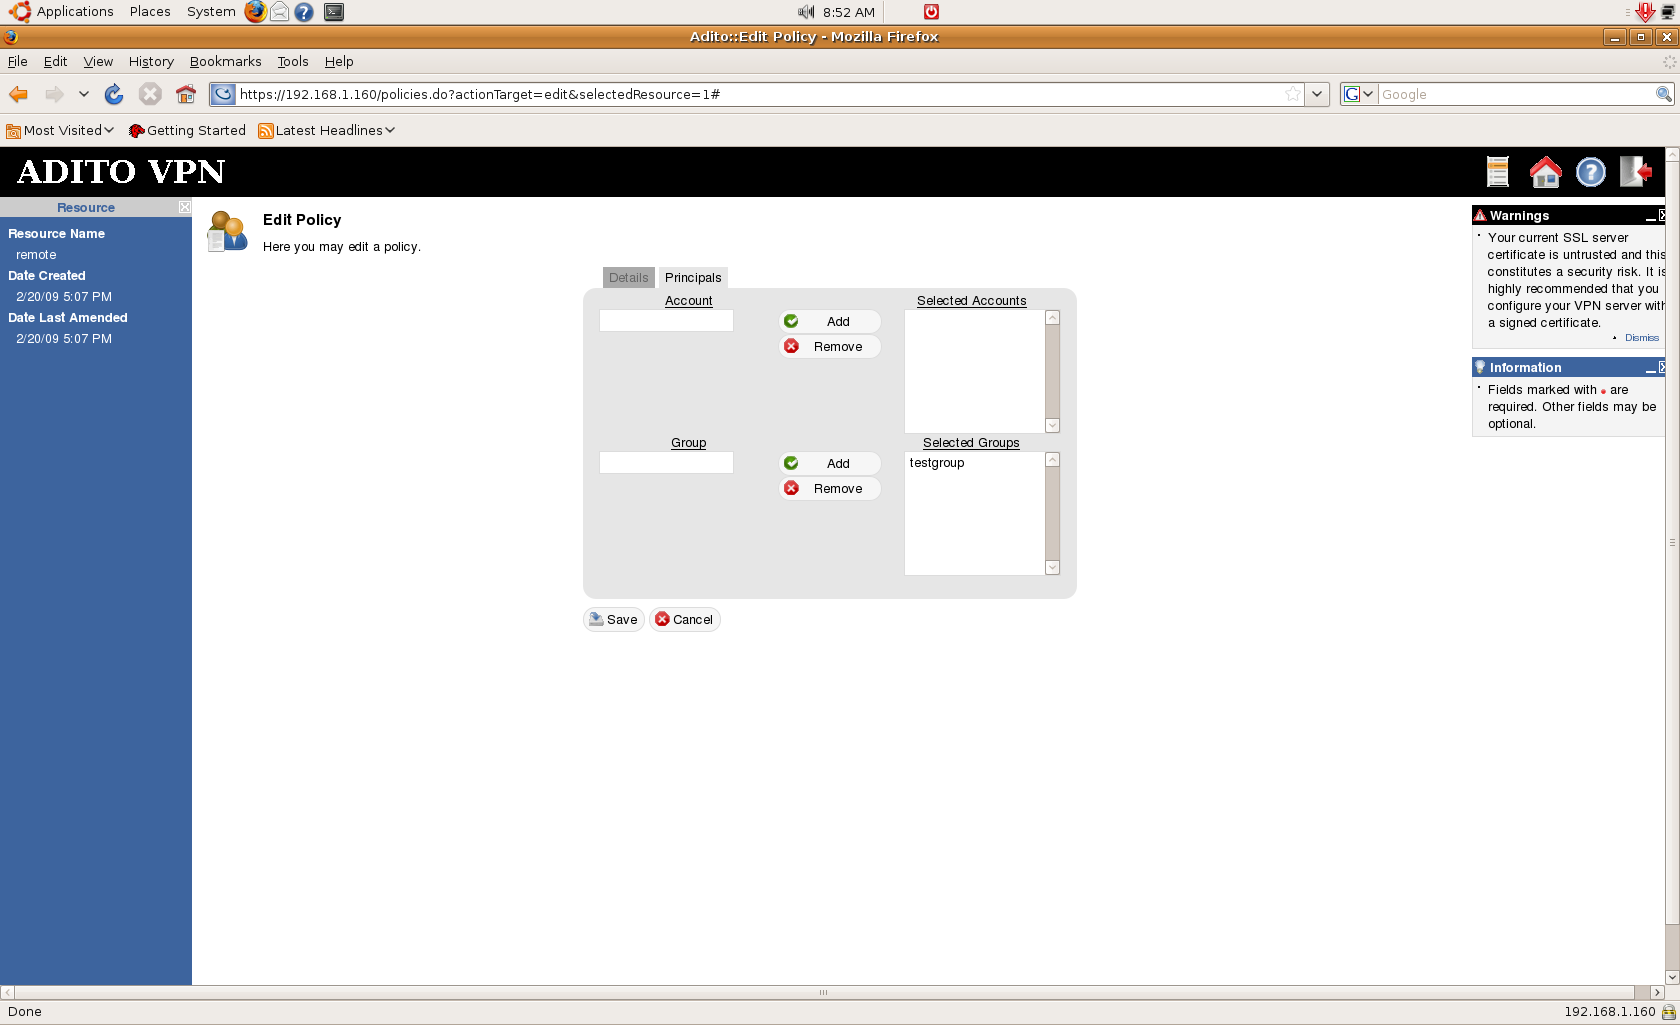
Figure 9: Policy Creation

Now proceed to the creation of SSL VPN resources. SSL VPN resources can include a Web forwarded site, a Network Place, an Application, or an SSL tunnel configuration. Web forwarded site is used when you have an internal Web site that you want to be accessed by remote users, Network place is for remote network file shares, and Application is for a specific resource that can be accessed using web based Java applets or extensions — such as a web based RDP connection. SSL tunnel can be used to directly tunnel traffic from a specific resource. For example, you can tunnel SMTP traffic from a specific host to the remote user.

As mentioned earlier, I will demonstrate how to set up a web based RDP to your Windows systems and also access a network file share. Let’s start with RDP. First go to Applications under Resources. There, you will find a list of all available application shortcuts. We will create one for our RDP connection. Click on “Create Application shortcut”. The application shortcut wizard will appear and guide you through the step by step process.

Figure 10: Application Shortcut - RDP

The first step is to select the necessary application extension. After that, supply the name, and a few other details, for the shortcut.

The next part is to configure the RDP parameters. Here, you have to specify the hostname or IP address of the internal Windows terminal server, the RDP port (default is 3389), the domain name (if necessary), RDP logon credentials and the bandwidth and screen settings of the connection. Once configured, proceed to the next step and insert the application shortcut into a policy for users and groups to have access to this shortcut. After that, save the shortcut you’ve made.

Now let’s test the web based RDP. For me to test that, I’ve accessed a remote system in my office through VPN. From there, I access the public IP of the Adito server and it displays the login screen. I used one of the users I’ve created. Once I log-in, I can now proceed to the Adito user interface and the application shortcut created is displayed there. Just click on it to access. Adito will install its agent to the client and you must have at least Java Runtime 1.5 in your system. Once installed, it will now connect to the Windows RDP.

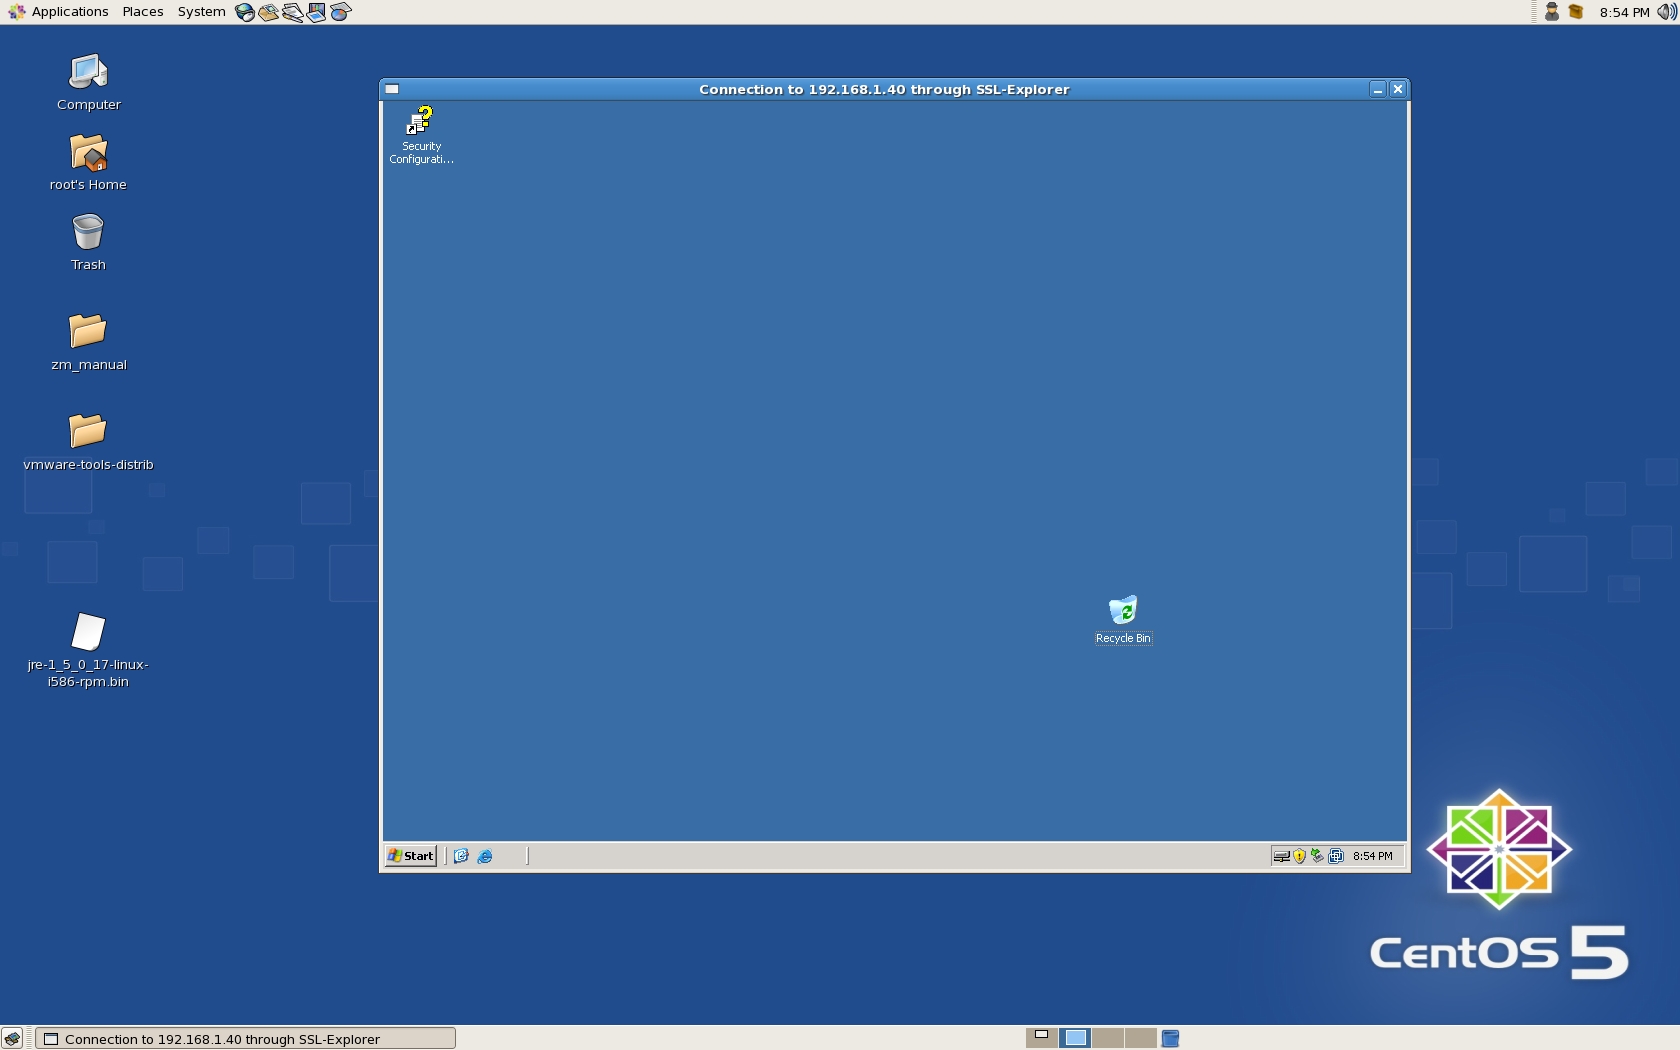
Figure 11: Loading Adito Agent

Figure 12: Web-based RDP

With just a simple configuration, you now have a SSL VPN which provides web based Windows RDP.

Next we configure the Network Places resource. The process is very much the same as that for the application shortcut. Just go to network places under Resources and create a new one. Input a name, and a few other details, for it. On the Network Places parameter page, you can select what type of file system the resource (Windows share, FTP, etc.) will be. If you’re not sure of the settings, just select automatic and put the share paths you use when accessing them. For example, for a Windows share, you can put \\server\sharename. The wizard will automatically configure the right detailed settings and you simply need to supply optional authentication credentials — if you don’t use any credentials you will be asked for them when you access the resource. Then, insert the new Network Places into the necessary policy and save it.
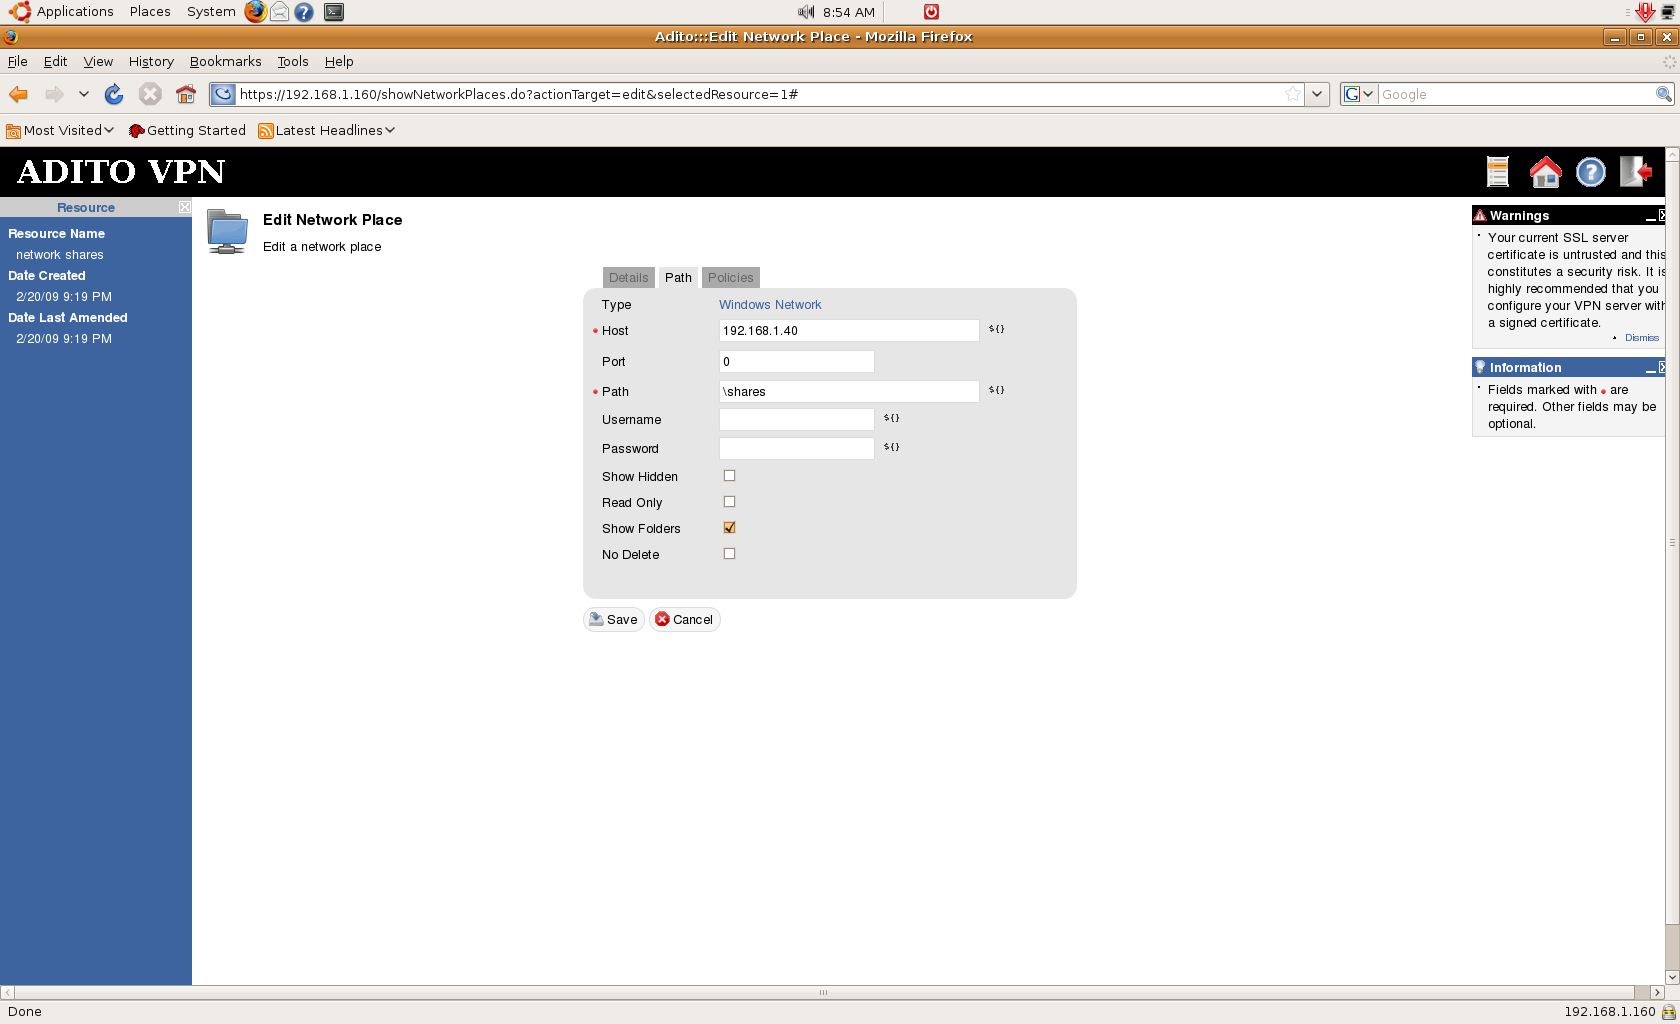
Figure 13: Network Places Parameter

On the Adito user client interface, the shortcut will appear. Just click on it and wait for it to load.

Figure 14: Network Place Access

The pop-up window that will appear will ask you for credentials. Just enter your credentials for the file server and you will now have access to the remote network share. Depending on your permissions (in Windows for example) in the network share, you can create, delete, move, or copy files and folders.

There are many other options in Adito SSL VPN aside from the basics discussed here. Some tips and documentation are available at http://adito.wiki.sourceforge.net that discuss more advanced configurations. Others may be covered more in depth in future articles if interest is sufficient.

Conclusion

If you’re looking for a free and easy to use SSL VPN solution, Adito is for you. Although some enterprise features are still not present, its active development to bring those features is something to look forward too.

Links:

1. Java SE Development Kit (JDK) version 6 update 11 available at:
http://java.sun.com/javase/downloads/index.jsp

2. Apache ANT version 1.7:
http://ant.apache.org/bindownload.cgi

3. Download Adito
http:// sourceforge.net/projects/adito

4. RDP extension:
http://adito.svn.sourceforge.net/viewvc/adito/adito-applications

* This piece was created as speculative work (on spec) or the rights to this piece have reverted back to the original author and is for sale. Learn more.

Underwater Welding Services from Commercial Diving Companies

When your car breaks down, you can always dial the number of the neighborhood mechanic in a jiffy. It’s easy on land, but what if the problem is underwater? Worry no more because Underwater Mechanix will fix your issues underwater. Underwater Mechanix is a team from the Association of Diving Contractors International. They are IMCA accredited commercial divers trained to aid the needs of underwater welding services and commercial diving companies. The team is familiar with EM385 1-1 practices. They are certified underwater and topside welders by the American Welding Society and are also certified diver medics.

They are located in Jacksonville, but they’re also serving all of Florida. Expect perfection and quality performance from the experienced team of divers from Underwater Mechanix. Their expertise includes: Underwater Power Plant Maintenance and Repairs, Erosion and Sediment Control, Ships Husbandry, Salvage and Marine Construction, Platform Installations, Offshore and Inshore Cable Installations and Burial, Underwater Welding Services, to Underwater Cutting and Demolition.

Unlike other commercial diving companies, Underwater Mechanix is not only concerned about getting things done; they put a premium on caring for the environment as well. For example, they removed a trash rack that was lodged from a hydro-electric power plant. A power plant in South Korea has already witnessed the excellent skills of the Underwater Mechanix when they repaired a concrete seal that had been leaking in a spent fuel pool. They were also hired to put a stop to substantial leaking in Lake Jackson Dam in Prince Williams County, Virginia. A decrease in the water levels inside the dam chambers allowed the pumping of concrete to fill the voids in the apron.

One of the projects of the Underwater Mechanix is the Heavy Lift Salvage where they had to remove the leg of a sunken oil platform and moved it to a designated reef location to accommodate ship traffic.

Underwater Mechanix has extensive experience in the installation of various kinds of erosion control pumps, articulating Kevlar woven concrete block mats, and riprap. They also provide maintenance services to the military like routine ship husbandry cleaning, propeller polishes, repairs, and video inspections to help maintain speed and efficiency. They have also performed emergency spud removal where they utilized a burning rig.

If you need the underwater welding services, or other services, of commercial diving companies and want to avail yourself of Underwater Mechanix but are worried about your budget, you can visit their website at http://underwatermechanix.com for a free estimate. They are open from Monday to Saturday, from 8 AM to 6 PM. Their landline is (904) 382-6547.

* Originally published on Underwater Mechanix August 11, 2014

Heavy Lift Salvage: Making Marine Salvage Easier

If only heavy materials used in the construction of large structures were like Lego pieces that could easily be assembled and dismantled, moving the fragments from one place to another would be a piece of cake. However, since it’s difficult to manufacture these gigantic Lego pieces, companies need marine salvage to transport, handle, and install heavy items which are indivisible. These items may weigh anywhere from one to over one thousand tons and may be more than one hundred meters, making it impossible to fit them into normal containers and other conventional transporters when being relocated.

Some examples of heavy equipment that require heavy lift salvage are generators, turbines, reactors, boilers, towers, castings, heaters, presses, boats, satellites, and military personnel equipment. For industries based offshore, parts of oil rigs and production platforms are also lifted, and some are removed once installation is finished.

Underwater Mechanix, a team of divers based in Jacksonville, specializes in deep water marine salvage and offers it as one of their services. They are from the Association of Diving Contractors International and are IMCA accredited commercial divers. They are not only a team of diver medics; they are also certified underwater and topside welders by the American Welding Society.

Underwater Mechanix divers put a lot of heart into their work and make sure that the output is perfect. They are not only conscious about the quality of the work that they do, they put a premium on caring for the environment as well. Their divers have extensive experience with technical salvage projects. An example of this is when they removed and transported a sunken oil platform leg to a designated reef location to make it easier for ships to navigate.

Other services of Underwater Mechanix include: Underwater Power Plant Maintenance and Repairs, Erosion and Sediment Control, Ships Husbandry, Salvage and Marine Construction, Platform Installations, Offshore and Inshore Cable Installations and Burial, Underwater Welding, to Underwater Cutting and Demolition. Their main location is Jacksonville, but they are also serving all of Florida.

If you are in need of marine salvage or their other services, you may visit their website at http://underwatermechanix.com. Their website has a free estimate feature that allows you to select the services you need and see how much it will cost. The Underwater Mechanix office is open from Monday to Saturday, from 8 AM to 6 PM. Their landline is (904) 382-6547.

* Originally published on Underwater Mechanix August 11, 2014

Making Memorable Meals with Beautiful Dish Sets

Many people regard dining ware and dish sets as more than just everyday objects used for eating. After all, much of the dining experience extends to not only the food we eat but also what we eat on. This is why many people invest in beautiful tableware, dinner sets, and utensils. You do not need to be a collector of such items to know that these can be appreciated for their craftsmanship and artistic embellishments. Many of us expect that these artistically designed sets often do not come cheap, and it may be challenging to find the perfect dinnerware that can be a beautiful addition to your dining table and your home. Fortunately, Beckalar.com can be your best resource in finding affordable yet attractive dining housewares.

While other online shops continue to offer nothing but conventional dish sets, Beckalar is an independent online shop that offers its customers unique dining ware finds at a fraction of the price. Beckalar boasts a huge variety of both new and pre-loved goods that will surely capture even the hearts of non-collectors. It has gained popularity for its vast assortment of items and the lower prices being offered in contrast to their competitors. They go beyond just being a one-stop shop for home embellishments. They offer new collectible home and kitchen accents as well as retail gently used clothes, used dish sets, and more. Beckalar takes pride in making sure that all the items are personally picked, gathered, collected, and taken care of from different parts of the globe.

If you are a collector, getting these dining sets to your doorstep is a cinch as all of the shopping can be done within the comfort of your own home. With Beckalar’s online shop, collectors and non-collectors alike can easily purchase the dish sets, ceramics, glassware, and many other items in just one click. Aside from the fact that Beckalar offers nothing but the best, they are also offering a special on discount dinnerware for those who would like to take home either a pre-loved or a new dish set. This opportunity will help you to get the best sets at a lower price point.

Meals at home will be extra memorable with Beckalar’s dish sets. With their antique ceramics and classic dinnerware, a regular meal at home will surely make a family feel like every day is a very special day.

* Originally published on Beckalar August 23, 2014

Mercedes S600 Guard – Bella’s “Before” Car in Twilight and How to Afford It

“Can’t imagine what you need missile-proof glass and four thousand pounds of body armor for around here,” a man at the gas station said of Bella Swan’s Mercedes Guardian; a present from Edward Cullen in Stephenie Meyer’s Twilight novel.

From Edward with love…a Mercedes Guardian

Stephenie described the Mercedes Guardian as a sleek and shiny missile-proof vehicle with four thousand pounds of body armor. It was even said to remain undamaged from a flamethrower or tanker truck attack. That explains why the Mercedes Guardian is very expensive. Back then, Bella had a Chevy truck. But why did Edward give her a new car? The key reason was to protect her. Stephenie Meyer stated in *The Twilight Saga: The Official Illustrated Guide*: “This car highlights the inherent differences in how Edward views Bella. Bella is content with her seat belt-lacking Chevy, while Edward puts her in a car generally reserved for land mine-avoiding oil sheiks, sparing no effort, or expense, to protect her in every way possible.”

A fictional car based on the real Mercedes S600 Guard

Yes, you read it right. That pricey life saver is real and we know it as the Mercedes S600 Guard. Mercedes specially made it for people like the President, Pope, etc. who need protection. Private individuals who want this same level of protection should expect to pay a whopping $500,000 and up. That is what it takes to own a bulletproof, bomb-proof, chemical warfare-proof vehicle with a V12 engine to back it up. Some models even contain enough gas and oxygen tanks to allow drivers half a year of mobility with limited stops.

The possibility of getting your own Mercedes S600 Guard

Owning a Mercedes S600 Guard is not just a dream. You can turn it into reality if you know how to find the best rates that match your credit score. Yes, auto loans can be a big help when you get a sleek, specially equipped, expensive car like the Mercedes S600 Guard. Here are two tips that can start you in the right direction with a Car Loan:

  • Various car dealerships may not give you the best rate for auto loans. That is why comparing the interest rates offered by different lenders can help narrow your options. It may also be helpful to consider your bank’s offer, since they may be more likely to give good rates to their own customers.
  • Some auto lenders pre-approve good rates for you, but there is still a chance they will change their rates at the end of your transaction with them, so it is wise to make sure you have final approval for the loan in writing.

Reasons People Should Buy A Second Hand Mercedes S600 Guard

There is nothing wrong with buying second-hand items, especially if it’s a lavish Mercedes S600 Guard that still offers great personal protection. This plush vehicle is being manufactured and distributed by a German car company that officially launched in the international market in 1972. Since then, such cars have become a symbol of luxury and wealth. While safety increases, the protection offered by this four-wheel-drive model will never diminish. In fact, since the *Breaking Dawn* novel of the Twilight Saga specifically mentioned the Mercedes S600, it will remain well-known for many years to come.

  1. It is an Investment
    Buying a second-hand Mercedes S600 is still an investment. This car may not be as popular as those promoted on the market today, but many consider it to be a classic car that can fit perfectly in any era. Stylish enough for any occasion, yet safe enough to give you peace of mind.

  2. It is Durable

    Another reason buying a Mercedes S600 is worth it, it’s made of the most durable car materials and built to last. Rest assured the Mercedes S600 Guard will serve its purpose and make you look good.

  3. It can Be Used for Formal Occasions

    Mercedes makes the S600 for luxurious use, thus it commands attention at weddings and other special occasions that require ultimate sophistication. Despite its mighty build, it can also blend into a crowd of glamorous people perfectly.

  4. Use it for Rugged Terrain

    Mercedes builds the S600 for heavy-duty use. This assures you will accomplish those tough tasks and still survive. The additional gas and oxygen tanks enable long road trips that even surpass many of the new breed of cars in road performance.

  5. It is Practical

    Buying a second-hand Mercedes S600 is practical for people who want to own a quality car at a lower price. Logically, a second-hand Mercedes S600 would cost much less compared to a newer model. This alone gives you an advantage. However, still check with your mechanic to ensure the vehicle is functioning optimally and in excellent condition before buying it.

  6. It is the Answer to People’s Dream Car

    Buying a second-hand Mercedes S600 Guard is the answer to your safety, style, and price dilemma. You’ve wanted it since *Breaking Dawn* and now know how to afford it.

With the aforementioned facts alone, you now have the logic to back up your passion for this mobile status symbol. Doing so is a safe investment with no chance of buyer’s remorse as it can protect your entire family for many generations to come.

*Originally written for CF Search Marketing August 08, 2013

Help! My Word Document Looks like an Email Document

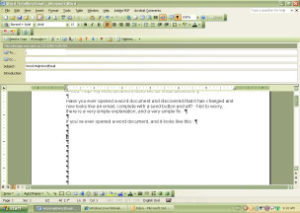
Have you ever opened a Word document and discovered that it has changed and now looks like an email, complete with a send button and all? No need to worry. There is a very simple explanation, and a very simple fix.

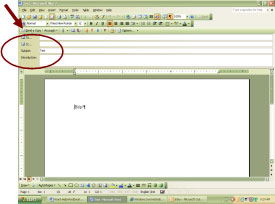
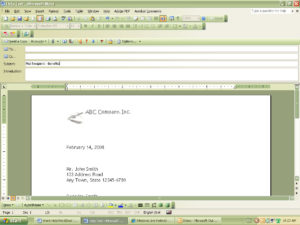
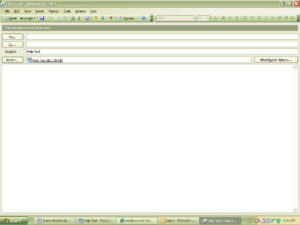
If you’ve ever opened a Word document and it looks like this, you’ve probably thought, ‘How did this happen?’. Your next thought was undoubtedly, ‘Great, now I have to start all over!’

Don’t panic; there is a very simple explanation and an even simpler fix!

Microsoft has created the option for you to send your documents via email in several formats. Now, when you wish to email a document, you no longer need to close out of the document to do so.

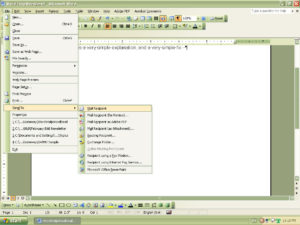
Click the File Menu option and choose the Send To option.

A sub-menu will appear giving you several mailing options:

Mail Recipient
Mail Recipient (for Review)…
Mail Recipient (as Attachment)…

If you choose the Mail Recipient option, Microsoft will temporarily ‘convert’ your document into an email vehicle, complete with TO:, CC:, Subject, and Introduction options. Enter the recipient’s email address and click the Send a Copy button to insert your document into the body of the email.

Once you check the Mail Recipient option, you must act. Unfortunately, there is no ‘undo’. If you’ve chosen this option in error, and you haven’t saved your changes before doing so, your only alternative is to send the document. If you aren’t ready to send the document to the intended recipient, enter your own email address and send it off.

If you close the document and save the changes when asked, the document will keep the email template active, and the next time you open the document, you will still see the same emailing options.

If you close your document without saving the changes, your document will go back to its original format. Remember, it is always a good idea to save your document before sending it.

One benefit for using this option if you have a company logo in the document’s header, it will appear in the email. This can add a professional flare to your email.

The other standard mailing options are Mail Recipient (for Review) and Mail Recipient (as Attachment).

The Mail Recipient (for Review) inserts your document with the subject: Please review: document name. Use this option for in-house or web sharing purposes only, as the attachment is ‘linked’ to the original document.

If you use this option to automatically enable reviewing tools, the recipient must edit the document using the review tools.

When emailing recipients not within your company or who do not share the same network servers, The Mail Recipient (as Attachment) is your best option. This option sends a copy of the original, which the recipient can easily open.

When choosing your document emailing options, always consider the recipient and your goals for sending the document. If you do not wish the recipient to have editing options, or if you wish to add a professional flare to your email, choose the Mail Recipient options. If you need them to edit the document, choose Mail Recipient (as Attachment) or (for Review).

Remember to always save your document before attempting to send. Then, if you click on the wrong button, the fix is simple.

* Originally published on WorldStart February 20, 2008.

Virtual Real Estate Blueprint – Part 10: Contract

Ensure the transaction is beneficial to both the buyer and seller before you continue. The contract is the actual written agreement between you and the seller. This is going to be the legal and binding part of purchasing a website that needs to be accurate. The purpose of a contract is not to give anyone distinct power over another. Rather, it should provide equal protection for everyone involved with the sale. The following checklist contains aspects of the contract you should not overlook.

The Agreement Itself

Some website sellers prefer to use an escrow service to ensure payment before they turn the website over to the buyer. This service takes the payment and notifies the seller when the funds have cleared. If the deal goes sideways, then the escrow service will keep the money until the site returns to the seller. If either party prefers to use an escrow service, the contract should reflect this. When it comes down to the contract used, you and the seller should both agree on it.

What Type of Contract Will You Use?

Usually, the seller chooses the contract. The seller has an infinite number of choices when choosing a contract. They can contact a lawyer and have an original one drawn up, or they may already have a previous contract from another website they sold. Quite a few online documents are also available to purchase for a nominal fee. However, if you go with a purchased contract, be sure to find out if it is actually a legal document. Signing a contract that isn’t legally binding can cause you to lose any money you hand over with no recourse.

What Does the Contract Include?

Contracts usually comprise more than a single page. There is a lot of legal jargon in most business agreements, especially when it entails the exchange of property. When you purchase a website, it’s like investing in physical real estate: so many of the inclusions on the contracts for either of these transactions are interchangeable. You will find some of the following sections on many, but not all, contracts:

  • Description of Parties
  • Description of Business
  • Description of Sale
  • Transfer of Property
  • Purchase Price
  • Assumption of Risk and Liabilities
  • Covenants
  • Transition
  • Participation or Absence of Brokers
  • Conditions
  • Closing
  • Miscellaneous
  • Signatures
  • Exhibits/Appendices

Is the Document Beneficial to Both the Buyer and Seller?

The contract should provide benefits for you and the seller alike. Having a one-way document only creates distrust between the buyer and the seller. The contract should protect the transfer of cash between you and the seller, and the ongoing commercial operations. The contract should document the method for transferring ownership of the site, so both parties understand how it will take place. This contract should also protect any future and current copyrights. An additional benefit, the contract should outline any terms of competition. Having a non-compete clause will save you both from future headache.

Who Does the Contract Protect?

Since a contract is an agreement, shouldn’t it protect all parties involved? No one wants to go into something that might turn into a huge personal loss. The idea behind buying and selling websites is usually to benefit both parties, so the contract should protect everyone involved in this transaction. Be sure to read over the entire contract, no matter how long it is, and check the fine print. It’s easy to miss something the first time around, so double check each section. Sellers are often only out to make money during the sale of their website and want the contract to be clear and correct. However, there are a few who devise contracts that only protect themselves and not the buyer, so be careful.
Remember, you make the real, long-term, money at the time of purchase and not while selling something. The seller may draw up the contract used for a website purchase, but both parties need to agree upon it. It doesn’t hurt to ask questions about the contract. Asking questions shows the seller you know what you are getting into and you know what website purchases involve. Be sure to go over this checklist and add a few things of your own as you think of them. Then, if you still are not sure you have completely minimized your risk, take Henry Ford’s advice and hire an expert of your own–a little investment now can save you many times over in the long term.

*Originally published on WorldStart July 06, 2010

Virtual Real Estate Blueprint – Part 09: Transaction

How a real estate transaction works

If the price is right, it’s time to finalize the details of turning over property. An ideal transaction is quick and painless for both parties involved. The checklist below covers different aspects of the transaction you need to consider when taking on the purchase of a website.

Make Sure Everything Is Upfront with the Seller

You’ll want to double-check any documents and make sure they accurately reflect your agreement with the seller. This is one time when you don’t want to be making any assumptions. You should write everything out agreed upon by both you and the seller. If there were any stipulations made, make sure this is all in writing. It’s also wise for both of you to sign all the paperwork. You want to be sure that everything is out on the table right from the beginning.

Know How the Transaction Will Take Place

Dealing with a seller over the Internet isn’t uncommon, but it’s always good to know in advance if this is going to be the case. Don’t expect to meet face-to-face with a seller that lives in another country, even though personal meetings will make this transaction seem much smoother sometimes. Be sure to have all contact information, in case questions arise.

Have a Time Frame Set Between You and the Seller

Are you supposed to complete the transaction within a week? In a month? Having a time frame set for this transaction is going to help both you and the seller set realistic expectations. No one likes to drag out transactions for longer than necessary. The time frame will also help give you an idea of how much time is available for additional arrangements you may need to make to complete the transaction.

Is There a Specific Sequence of Events for This Transaction?

Most transactions have a specific order to them. Purchasing a website is not much different from buying a physical piece of property. You need to take certain steps before you proceed. Try writing everything down you need to achieve in this transaction and put an order to it. This organized list may make it easier to see which steps come first. Having steps listed out also enables you to come up with a method to make this a smooth transaction.

Who Is to Transfer Everything into Your Name?

If you are waiting for the seller to make the name transfers, but the seller assumes you are taking charge of this task, then no one is going to benefit from this new website. The seller sold it to you, but you cannot use it until the name transfer takes place. Find out what you need to do to complete the name transfer. Be sure to have all the information necessary to do the transfer successfully.

What Fees Does the Transaction Include?

As with any purchase, there are fees that apply to buying a website. Costs will already include the purchase of the domain name, transfer of the site to your hosting service, and any necessary alterations. On top of all this, there will be annual renewal fees for continued ownership of the domain in your name, plus monthly hosting, and any other maintenance fees that may arise. You can save some money by being able to maintain your website, but this isn’t always possible. There are some people that are too busy with multiple sites and don’t have the time to keep them all running smoothly on their own.
Be sure you cover all these bases before you sign the contract.

*Originally published on WorldStart June 29, 2010