
VPN is becoming more common nowadays, not only in enterprise environments but also in personal home networks as well. Many use VPN to access both company office resources as well as their home networks. VPN can provide the security users need to remotely access their network but there are two types of VPN used today: the more common and older IPSEC VPN and the much newer SSL VPN. IPSEC VPN is well established in enterprise environments today and can also be used in home networks. Most of the midrange, or even entry level, routers from popular network device manufacturers include IPSEC VPN functionality. You can also see software based forms available for free — especially since it runs in a UNIX/Linux environment. Although well established and proven already, IPSEC VPN implementation can be quite a task for the normal user. There are many parameters to configure, ranging from authentication and encryption algorithms up to features such as NAT-T, and you must match all of those settings to each end of the VPN tunnel. You also need to use IPSEC VPN client software that can vary by manufacturer. SSL VPN is gaining popularity due to the fact that it provides better security than IPSEC, since it uses SSL, and is also easier to setup and use. You don’t have to configure those authentication or encryption algorithms — much less match them on each end of the VPN tunnel. You also don’t need specific VPN client software, clientless, to connect. This means that you only need a Web browser and Java support to connect to your office or home resources.
Most network device manufacturers today include devices that support SSL VPN in their product lines. Popular examples include the Secure Access device from Juniper and the VPN Concentrator from Cisco. However, these commercial SSL VPN devices usually cost several, if not tens of, thousands of dollars. For small business or home usage, these devices are cost prohibitive. If this situation sounds familiar, then Adito is your answer.
Adito is a free and open-source solution for SSL VPN that originated in the now closed propriety software SSL-Explorer. Before Adito, a company called 3SP provided the SSL-Explorer Community edition for free — offering access to the basic functionalities of SSL VPN. They also had a commercial edition with more features but the free Community edition was enough for most SSL VPN needs. However, just last year, 3SP was acquired by a company called Barracuda Network who stopped providing SSL-Explorer as a software and made it hardware based — which cost at least a thousand dollars. With this development, a group of people who love the great functionality that SSL-Explorer offered decided to continue the development of the now abandoned SSL-Explorer to develop Adito. All of the features you would expect from SSL-Explorer such as Windows AD (Active Directory) integration, UNIX directory integration, User/group based access, remote network file sharing, web forwarding, web based RDP, SSL tunneling, etc. are also included.
Adito compared to Common VPN
I would expect that you have already encountered VPN or are at least familiar with it in one way or another. You may have encountered it at work — especially when you’re mobile or at home and need to access office resources. Or you might be using it to connect to you home PC to do some remote tasks. Most VPNs either use IPSEC technology or, sometimes, the less secure PPTP. These VPN technologies require some sort of VPN client software on the client side to work (especially the IPSEC VPN). Adito however, is a clientless VPN. Since Adito is Java Based, which resides on most PCs today, this means that you don’t have to install anything on the client PC. It is based on SSL VPN, which is much more secure that IPSEC, and is also much easier to setup as compared to IPSEC — which requires many parameters such as encryption algorithms.
Adito works by creating resources inside the private network and creating an SSL VPN tunnel when the client requires access to that resource. Therefore you can easily manage and control what resources remote users access — unlike other VPNs in which they can access the whole network when connected. While you can also control the internal network resources that a user can access in most VPNs, this usually requires lengthy policy creation or access list definition which can be both troublesome and time consuming if you have many users. In Adito, user access and management is simplified. You may notice that the most common resource that can be used in Adito is RDP through SSL VPN. You might say that there is numerous free software that can also do that. However most of these RDP programs do not have adequate security if used alone. You’ll most probably need to also use a VPN tunnel for it to be secure. And most of these RDP software require an RDP client of some sort. Adito doesn’t need any client software installation since everything is Java based. Finally, aside from the RDP capability, you can access securely internal web based applications, remotely access network shares, and create SSL VPN tunnels for applications that can be accessed through TCP/IP such as SMTP or IMAP for corporate email).
For example, for a common office setup, users usually access a file share, an internal company web site or web based application, and an email server. For them to access it when they’re not in the office, Adito can provide those resources in a secure manner using its features such as Network Places, Web Forwarding, and creating an SSL Tunnel for SMTP Mail Server. In case they need to access a terminal server, that can be easily done through Adito’s Java based RDP application. Please note that all of these resources pass through an SSL VPN tunnel that’s being created as users access the resources.
Using Adito
Adito is platform independent and is available as a source package for Linux distributions as well as Windows. For this article, I used Ubuntu 8.04 (Hardy) LTS server edition. The basic requirements to install and run Adito are Java runtime environment version 1.5 or above from Sun Microsystems. I also used Java SE Development Kit (JDK) version 6 update 11 [Links ref. #1]. If you’re in a CentOS or Redhat environment, you can get an RPM package from there as well to run. You can also use your distribution’s package manager and, in my case, I use apt-get to download and install the latest JDK build. To do that, run this command:
# apt-get install sun-java6-jdk
In case your distribution already has an older Java package installed, you must configure your distribution so it will use the correct version. First issue this command:
#ls –l /usr/lib/jvm
total 4
lrwxrwxrwx 1 root root 19 2008-12-29 18:35
java-6-sun -> java-6-sun-1.6.0.07
drwxr-xr-x 8 root root 4096 2008-12-29
18:35 java-6-sun-1.6.0.07
The previous command will list the available Java version installed on the system. As you can see, my system only has Java 6 installed since the base installation of the Ubuntu system is very minimal and doesn’t include any Java packages. If you have more than one version, you will have to issue the following command in a Debian or Ubuntu environment.
# export JAVA_HOME=/usr/lib/jvm/java-6-sun
Also note that you do not put the specific Java build in the previous command, indicate “java-6-sun” and not “java-6-sun-1.6.0.07”, since it will cause problems when you upgrade the Java build if you use the specific build name. You must also verify and correct, if necessary, the version used by other Java components such as Javac, Javah, Java-vm, etc. For Debian and Ubuntu systems, the different versions are managed using the alternatives system and you can easily check that using the program “galternatives”. Just use apt-get to download and install “galternatives”.
# apt-get install galternatives
Adito also requires you to install Apache ANT version 1.7 or higher [Links ref. #2]. You can either directly download it or use your package manager of preference.
# apt-get install ant
Now you can proceed with the Adito installation. First, download a copy of Adito [Links ref. #3], and choose whether you want the source or binary package. The latest version is 0.9.1 and I downloaded the binary tar.gz package. Since I use Ubuntu Server without any desktop interface, I’ve used “wget” to download Adito:
# wget “Adito direct URL link”
You can then extract the content of the tar.gz package. For my system, I put Adito at /opt directory.
# tar –xzvf adito-0.9.1-bin.tar.gz –C /opt/
Go to the Adito directory /opt/adito-0.9.1 and start the installation process.
# cd /opt/adito-0.9.1
adito-0.9.1 # ant install
This will start the installation process of Adito. The setup process is highly dependent on the Java environment of the system. So if you didn’t configure properly the Java version (if you have multiple versions) from the previous steps, the setup won’t continue. If, for example, you don’t install the Java package which comes from the official Sun site, the setup will indicate errors, that you’re using the GNU/GCJ version of Java, and will advise you to install the Sun version. Also make sure that you’re in “su” mode or the setup process will also halt. If everything is good, the setup process will show a message telling you to access the web based installation wizard of Adito. Open your favorite browser and type the address indicated in the message. This is usually in the form of “http://IP address or hostname:28080/. The address will bring you to the setup wizard. In case you need to stop the setup wizard process, you can click “cancel” in the web based wizard or press “ctrl C” on the CLI.
The web based setup wizard is very straightforward. First, you have to create or choose an existing certificate.
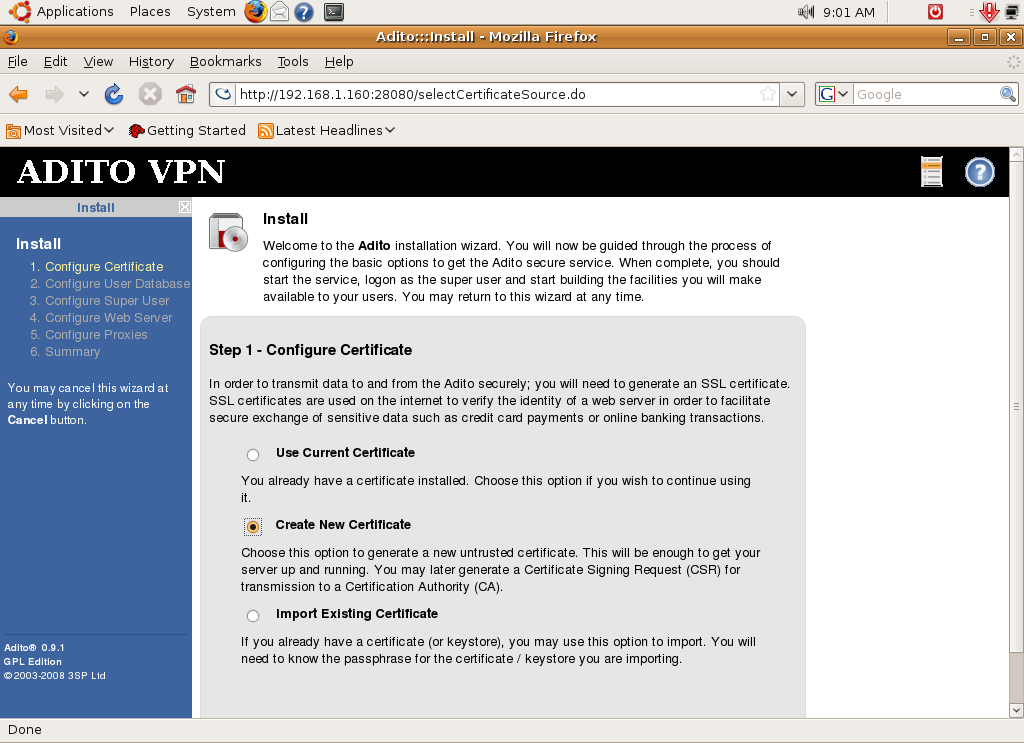
If you don’t have a certificate, create a new one. The certificate that you will generate is not trusted but will be enough to run the Adito server. For security purposes, you must use a certificate signed by a certificate authority (CA). If you already have an existing certificate, you can import it and just supply the necessary password. In my case, I chose to create a new certificate.
The next step is to create a password, if it’s a new certificate, or supply the correct password if the certificate is imported.
In the following step, you will need to provide the certificate information such as hostname, organization, location, etc. — this step is not necessary if you choose to import a certificate and you will proceed directly to the user database configuration.

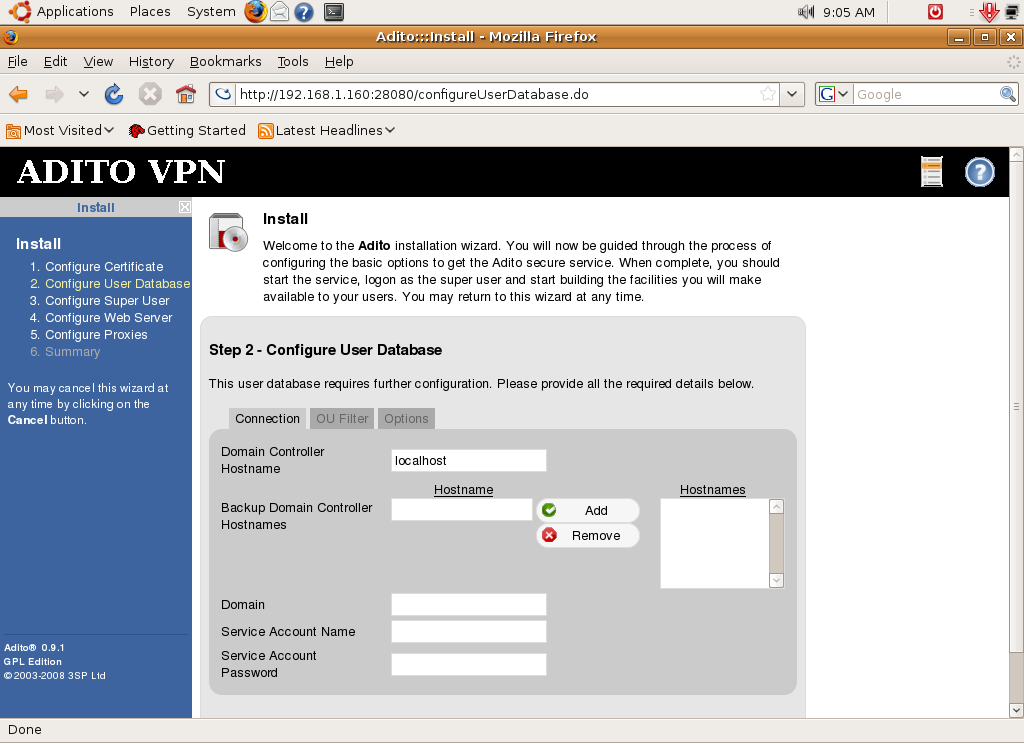
Once you finish with the certificate setup, you must now configure the Adito user database. Adito can get user information from three sources or mechanisms: through Windows AD, through Adito’s built-in user database, and through UNIX directory.
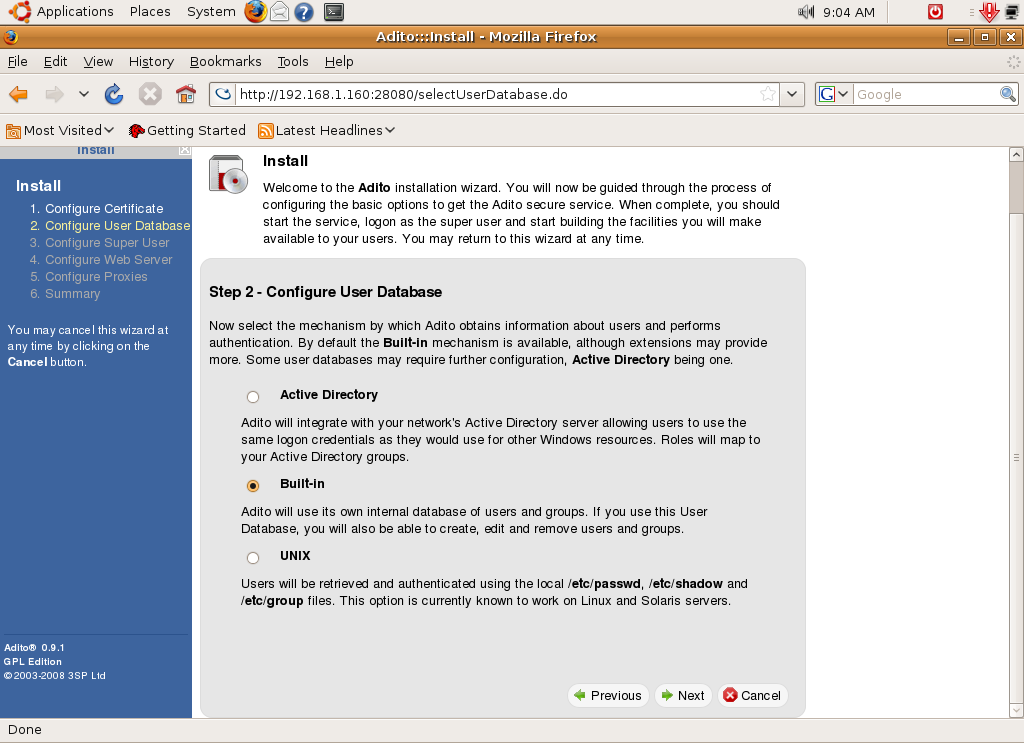
If you will use Adito for home or small business purposes, it would be best if you use Adito’s built-in database. In this mechanism you will create the users and groups inside Adito’s management interface. If you have a big organization and already have an existing directory of users through Windows AD or a UNIX directory, it’s best to use the AD or Unix functionality since you don’t have to create each user again in Adito. If, for example, you choose AD then the next steps will require you to supply AD information such as domain controller hostname, backup domain controllers, domain name, etc.
If you choose the built-in database, just like in my case, you will go directly to the “Super User” configuration.
The “Super User” basically refers to Adito’s administrator that can configure and manage Adito SSL VPN. You just supply the username, password, and email of the “Super User” in this part.
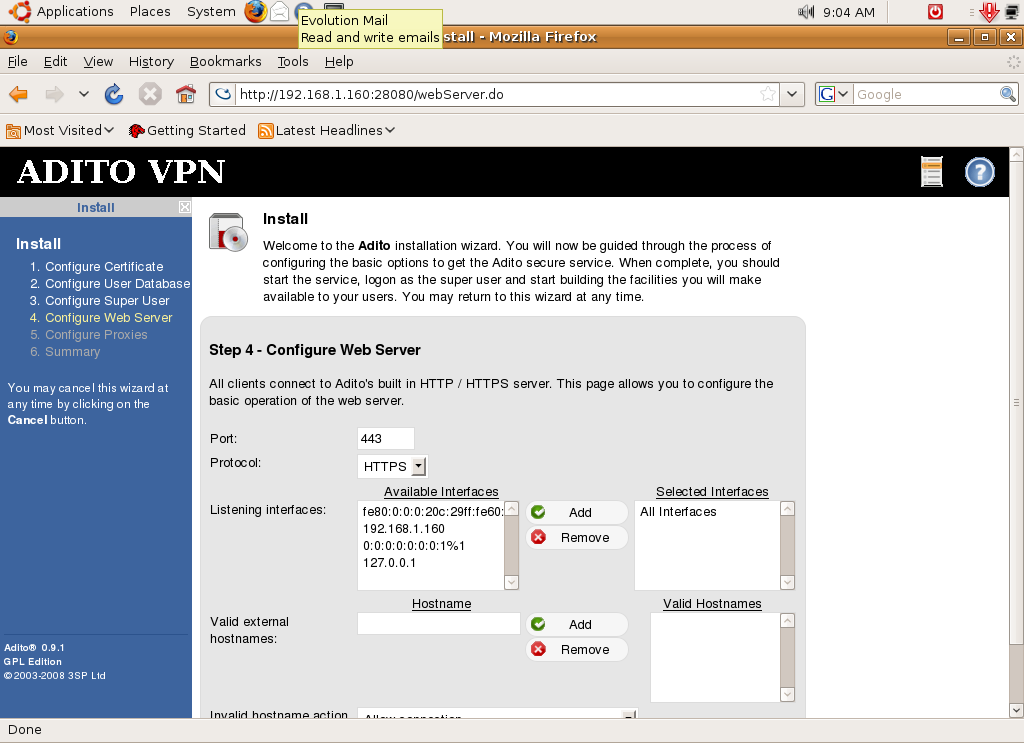
The next step will take you to the configuration of the Adito web server. You just have to configure the port (default is 443), protocol (definitely HTTPS), the listening interface of the server, and the accepted external hostname. If you only have one public address and already have a web server using port 443 for HTTPS, just supply another one. In my case, I used port 8443. Although it is quite obvious that HTTPS should be used in SSL VPN for security, you can also choose HTTP for the protocol if you have good reasons to do so. You must also choose the listening port of the server. All of Adito server’s interfaces are in listening mode by default. For security, you can specify a specific listening interface. You can also set the external hostname of Adito in which it will allow a connection. The default behavior is to allow a connection to Adito SSL VPN even if the external hostname is invalid.
The next step is proxy configuration. This is only applicable if you are behind a proxy to access the Internet. Adito might need access to external resources such as extension downloads thus the need for Internet access. In my case, I’m not behind a proxy so I just bypassed it. If you are behind a proxy, simply check the proxy box, and supply the proxy settings.
The next screen in the wizard will show you the summary of what you have configured. If all of your information is correct, just click “Finish” and the wizard will apply the changes.
After applying the changes, Adito setup wizard will shut down. Next, return to the CLI shell to start the Adito setup process. After the Adito installation, you still have to install its service. To do that, just use this command:
adito-0.9.1# ant install-service
You can now start Adito services using the command below.
Adito-0.9.1# ant start
To verify that everything is working normally, open your browser and enter the address of the Adito server. The address is in the form, “http://IP address or hostname:8443”. You will notice that the 8443 in the address is the port we specified during the setup wizard process. Just change it to reflect the port you have specified. If everything is set up properly, you will enter Adito’s login screen.
Once at the login screen enter the “Super User” account you have created and its associated password. You will then enter Adito’s management screen.

If you have made it this far, then you have successfully installed Adito. You can now start configuring your SSL VPN resources.
Creating and Managing Resources
One nice feature in any SSL VPN implementation is that you can specifically choose a resource for remote users to access. This can be done also on IPSEC VPN but will require much more configuration since you must configure firewalls (for the specific port), user/group policies, etc. With SSL VPN, once the user/group database is in place, you just create a policy (which can be easily done), create a resource (RDP, network file sharing, etc), bind it to the policy and you’re done. In Adito, the management interface is so simple that you can master it in no time. Within the scope of this article, I’ll show you how to configure Adito for Windows RDP/Terminal access as well as file sharing. By the way, if you have spare public IP addresses, you can assign a public static IP to the Adito server to access the SSL VPN remotely. Otherwise, you can also use port forwarding if you’re short on public addresses.
Now going on to the Adito management interface, you will observed that the menu is subdivided into four parts: Configuration, Access Control, Resources, and System. Under Configuration. You can configure the system settings, such as the one you configured on the setup wizard, and even configure security options such as messaging settings (for mail delivery), Windows integration (for DNS,domain settings, etc.) and others. However, since the default settings are adequate for a working SSL VPN, I will spare you many of the other details for now until there is sufficient interest.
One important component under Configuration that I will discuss is the Extension Manager. Since Adito comes from the SSL-Explorer community edition, it only contains basic extensions like SSL-Tunnel, Applications module, Network places, etc. You won’t have extensions for Drive mapping, SFTP work places, Virtual hosts, etc. But with active development of Adito, more SSL-Explorer enterprise features may be added very soon. For now, we will have to use an RDP extension for RDP connectivity.
Visiting the Adito application URL [Link ref. #3], there are several extensions for tightvnc, ultravnc, winscp, etc. Choose the properjavardp for native Windows RDP/terminal connectivity. When you download the file, it is in a tar package and you have to extract the zip file inside. Once extracted, just go to “Extension Manager” under configuration and on the right side, click on “Upload extension”. Browse for the zip file and upload it. Once uploaded successfully, it will be shown in the extension manager. Now that we have an RDP extension, let’s proceed to user/group creation.

To create a user, go to Accounts under “Access Control”. It will show the users database. On the right side, click “Create new User account”. You will just need to enter user information including the username and password on the screen that follows.

You can also assign the user to a group during creation. Just click on Save to finish the process. If you’re using the built-in user database for Adito, just create more users as needed.
The next step is to create a group. Creating a user group can help you easily manage and assign the resources and policies for a set of users. The group creation process is very much the same as user account creation. You can also put users inside the group during creation.
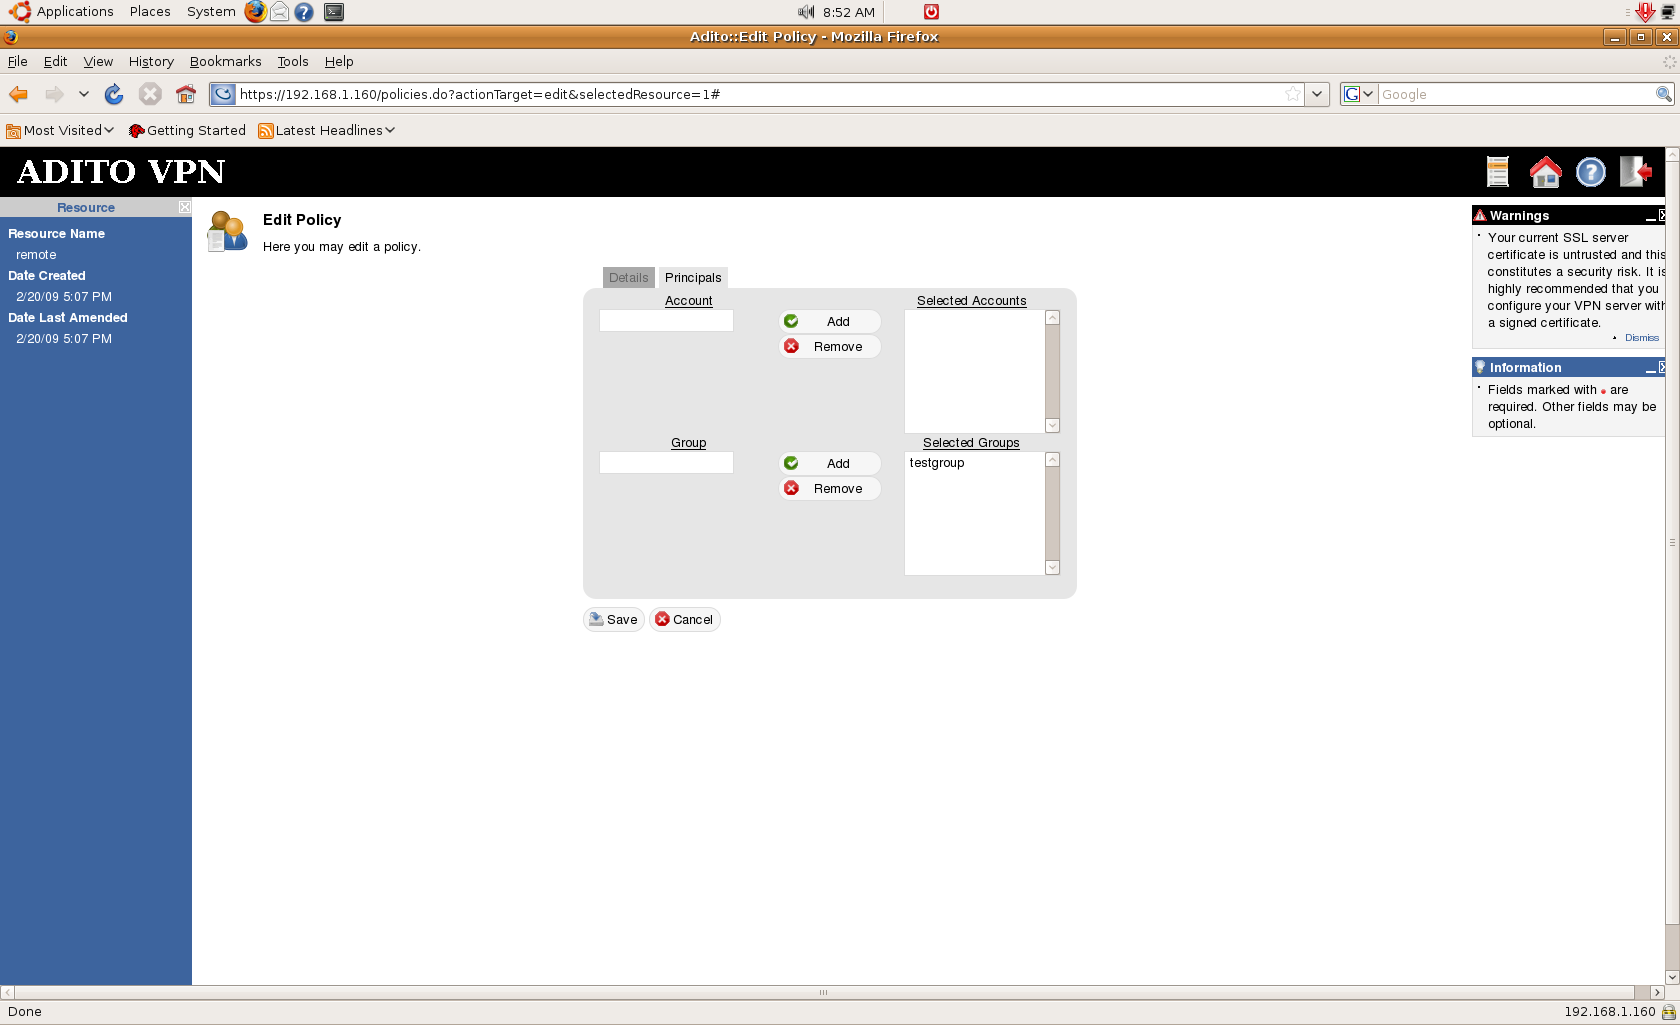
After you set the users and their corresponding groups, you must create a policy. The policy can be assigned to a user or a group and it defines to what resources the user or group has access. Creation is very simple. Simply fill in the policy name and description, assign it to a group or user, and you’re finished.
Now proceed to the creation of SSL VPN resources. SSL VPN resources can include a Web forwarded site, a Network Place, an Application, or an SSL tunnel configuration. Web forwarded site is used when you have an internal Web site that you want to be accessed by remote users, Network place is for remote network file shares, and Application is for a specific resource that can be accessed using web based Java applets or extensions — such as a web based RDP connection. SSL tunnel can be used to directly tunnel traffic from a specific resource. For example, you can tunnel SMTP traffic from a specific host to the remote user.
As mentioned earlier, I will demonstrate how to set up a web based RDP to your Windows systems and also access a network file share. Let’s start with RDP. First go to Applications under Resources. There, you will find a list of all available application shortcuts. We will create one for our RDP connection. Click on “Create Application shortcut”. The application shortcut wizard will appear and guide you through the step by step process.

The first step is to select the necessary application extension. After that, supply the name, and a few other details, for the shortcut.
The next part is to configure the RDP parameters. Here, you have to specify the hostname or IP address of the internal Windows terminal server, the RDP port (default is 3389), the domain name (if necessary), RDP logon credentials and the bandwidth and screen settings of the connection. Once configured, proceed to the next step and insert the application shortcut into a policy for users and groups to have access to this shortcut. After that, save the shortcut you’ve made.
Now let’s test the web based RDP. For me to test that, I’ve accessed a remote system in my office through VPN. From there, I access the public IP of the Adito server and it displays the login screen. I used one of the users I’ve created. Once I log-in, I can now proceed to the Adito user interface and the application shortcut created is displayed there. Just click on it to access. Adito will install its agent to the client and you must have at least Java Runtime 1.5 in your system. Once installed, it will now connect to the Windows RDP.


With just a simple configuration, you now have a SSL VPN which provides web based Windows RDP.
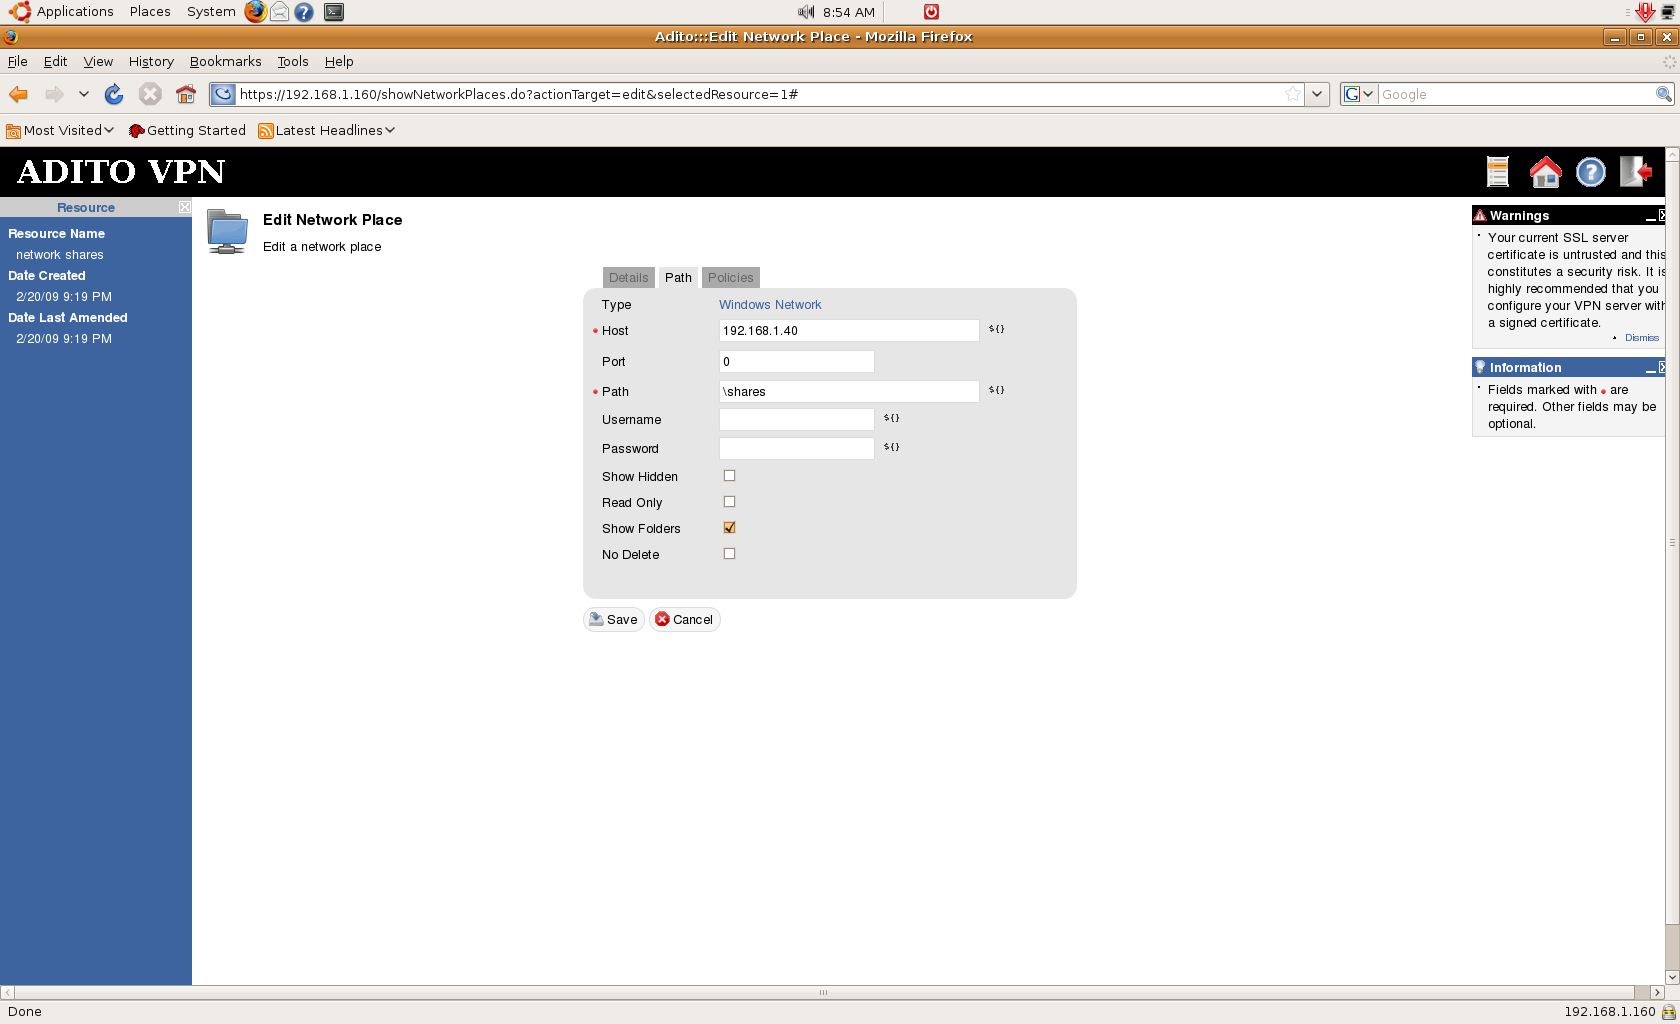
Next we configure the Network Places resource. The process is very much the same as that for the application shortcut. Just go to network places under Resources and create a new one. Input a name, and a few other details, for it. On the Network Places parameter page, you can select what type of file system the resource (Windows share, FTP, etc.) will be. If you’re not sure of the settings, just select automatic and put the share paths you use when accessing them. For example, for a Windows share, you can put \\server\sharename. The wizard will automatically configure the right detailed settings and you simply need to supply optional authentication credentials — if you don’t use any credentials you will be asked for them when you access the resource. Then, insert the new Network Places into the necessary policy and save it.
On the Adito user client interface, the shortcut will appear. Just click on it and wait for it to load.
The pop-up window that will appear will ask you for credentials. Just enter your credentials for the file server and you will now have access to the remote network share. Depending on your permissions (in Windows for example) in the network share, you can create, delete, move, or copy files and folders.
There are many other options in Adito SSL VPN aside from the basics discussed here. Some tips and documentation are available at http://adito.wiki.sourceforge.net that discuss more advanced configurations. Others may be covered more in depth in future articles if interest is sufficient.
Conclusion
If you’re looking for a free and easy to use SSL VPN solution, Adito is for you. Although some enterprise features are still not present, its active development to bring those features is something to look forward too.
Links:
1. Java SE Development Kit (JDK) version 6 update 11 available at:
http://java.sun.com/javase/downloads/index.jsp
2. Apache ANT version 1.7:
http://ant.apache.org/bindownload.cgi
3. Download Adito
http:// sourceforge.net/projects/adito
4. RDP extension:
http://adito.svn.sourceforge.net/viewvc/adito/adito-applications
* This piece was created as speculative work (on spec) or the rights to this piece have reverted back to the original author and is for sale. Learn more.